I was on YouTube this evening and found a cool video featuring a red '65 (ok, looks like it's really a '66) and the song "65 Mustang"... Yeah!
And here are the lyrics.
Thursday, December 18, 2008
Sunday, December 7, 2008
Brand New Repro Parts, Part II: More Adventures in Head-Scratching
Here's an issue that has caused me to waste some time, so maybe this tip will help somebody else. I bought a new fuel tank sending unit for my new 22 gallon fuel tank. (This tank is from a 1970 Mustang and holds more fuel than the stock 16 gallon tank from 1966.) The sending unit was from NPD and is supposed to be a good quality one with a brass float and 3/8" line. I think all of the parts houses will have this same issue, so I don't think NPD could do much about it.

Anyway, the first two floats failed by filling with fuel, causing the gauge to always read "E". The first floast failed within one day, and the second within one month. I finally replaced only the brass float and not the whole repro sending unit. At left is the brass float I ordered from NPD, and it came in a Ford package, which was a nice surprise.
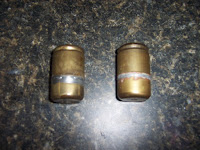
And here are the two floats together. The import is on the left and Ford is on the right. They seem reasonably close to being the same, but notice the soldering (or brazing?), which is more controlled on the Ford one.

And here's the failure point of the import on the left both times (the first time there was a leak on the side too): the solder on the end cap looks like a big porous blob stuck on there. The Ford float has solder that is accurately placed and very smooth for leak-free service.
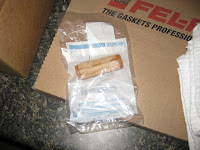
As a matter of fact, the import sending unit design apparently has another issue that quickly happened to both units I bought: The white plastic sock that is stuck on the intake tube to keep debris from getting sucked into the fuel line actually fell off or melted off and is presumably lost in the fuel tank somewhere. (With a new tank and a fuel filter before the fuel pump I'm not really worried about that right now.) But the parts houses do sell a NOS sending unit filter or sock for about $22. I just bought one and will install it when I have a chance (see photo). [Edit: Just installed it a couple months ago!]
In hindsight, I'd use a NOS brass float ($7) and NOS sending unit filter ($22) that are available in Ford packages from places like NPD and Mustangs Unlimited. Then I'd buy a $25 repro sending unit and hope for the best. I would not use a repro sending unit again without upgrading the sending unit filter and float. Of course if you can score a NOS sending unit assembly for $50 that's the best bet, but these go for over $100 easy when they come up on eBay.

Anyway, the first two floats failed by filling with fuel, causing the gauge to always read "E". The first floast failed within one day, and the second within one month. I finally replaced only the brass float and not the whole repro sending unit. At left is the brass float I ordered from NPD, and it came in a Ford package, which was a nice surprise.

And here are the two floats together. The import is on the left and Ford is on the right. They seem reasonably close to being the same, but notice the soldering (or brazing?), which is more controlled on the Ford one.

And here's the failure point of the import on the left both times (the first time there was a leak on the side too): the solder on the end cap looks like a big porous blob stuck on there. The Ford float has solder that is accurately placed and very smooth for leak-free service.
As a matter of fact, the import sending unit design apparently has another issue that quickly happened to both units I bought: The white plastic sock that is stuck on the intake tube to keep debris from getting sucked into the fuel line actually fell off or melted off and is presumably lost in the fuel tank somewhere. (With a new tank and a fuel filter before the fuel pump I'm not really worried about that right now.) But the parts houses do sell a NOS sending unit filter or sock for about $22. I just bought one and will install it when I have a chance (see photo). [Edit: Just installed it a couple months ago!]

In hindsight, I'd use a NOS brass float ($7) and NOS sending unit filter ($22) that are available in Ford packages from places like NPD and Mustangs Unlimited. Then I'd buy a $25 repro sending unit and hope for the best. I would not use a repro sending unit again without upgrading the sending unit filter and float. Of course if you can score a NOS sending unit assembly for $50 that's the best bet, but these go for over $100 easy when they come up on eBay.
Sunday, November 30, 2008
Odds and Ends: Part VI

I'm including the list of fluids in the car, since I learned a few things when selecting these, maybe this will help someone else.
The T5Z transmission is using Mobil 1 Synthetic ATF, as required (not gear oil). The brake system is using Valvoline Synpower full synthetic brake fluid; this exceeds DOT 3 and 4, but is not DOT 5. The 8" rear axle is using Valvoline 80W-90 non-synthetic gear oil, with a small bottle of friction modifier from the Ford parts counter. The non-synthetic oil with a small bottle of friction modifier was required for the Auburn differential back there. The engine oil is Red Line 10W30 Synthetic Oil - 1 Quart, Pack of 12
The coolant is the old-style green stuff from Texaco (not pictured). Not sure why I pictured the Stabil, but I use a little of that too in the high-octane gas.
Mentioned in this post:
Odds and Ends: Part V

The glovebox door has been loose since the day I got the car. I am reluctant to replace it since it is the original and even sports some car care service station stickers from the 1970's on the back.
The self-tapping screws and the holes they thread into are stripped, so I used machine screws, cut to length, as studs and epoxied them into the door. Then I used nylon lock nuts to secure the door. This works better but probably isn't a permanent fix. I wouldn't use lock nuts if I were doing this again; they thread too hard on the stud.
The photo shows the stock screw at left, and the new washer and nut at right, with the epoxied stud in the background. [Update: I've given up on this idea in recent months... I hogged out the holes with a drill bit and used larger screws to hold the glovebox door tight.]
Monday, November 17, 2008
Denied...
So yesterday I tried to attend the Collector Car Autofest in Raleigh. I was there earlier this year as a spectator, but hadn't brought the car since it was incomplete.

In fact, I had only brought one other car to any car show, ever. (That would be my '89 Mustang around 1992 in Tucson.)

Unfortunately, yesterday was the day for 1974--present vehicles, and the guy at the gate didn't want my '66 or my $25 in his view. Oh well.

Saturday was the day for vehicles through 1973... But Saturday was also raining so I wasn't going out with the car. If you drive a classic, you'd understand. :-)

Preparing for the show got me to complete the car (enough to show it) so that was good.

Sunday, November 16, 2008
Mission: Accomplished
The other day I dropped off the car with my painters so they could tweak the passenger door hinges. The door had sagged a bit when the glass was installed, and readjusting the door while the car is fully assembled is really a three-person job.

After I got the car home I installed the last door panel on top of a layer of Dynamat Extreme (to act as a watershield.) I was happy to install the final part on the car.

Of course, I will fix a few things here and there, but my pile o' parts to put on the car is now gone. Woo hoo!


After I got the car home I installed the last door panel on top of a layer of Dynamat Extreme (to act as a watershield.) I was happy to install the final part on the car.

Of course, I will fix a few things here and there, but my pile o' parts to put on the car is now gone. Woo hoo!

Tuesday, October 28, 2008
Another Milestone...
Installed the driver's kick panel, door panel with handles, sill trim, and recently installed the rear quarter panel on that side. I didn't use the stock watershields, but instead went with a layer of Dynamat Extreme. There are some small bumps on the top where the clips are sticking out a very little bit on the door panel. Probably not worth mentioning, but it's kinda bugging me. Hmmm... I do like the Medium Blue Metallic metal panels, original 66 Blue seats/dash pad/door panel, with the Ford Blue carpet. (For reference, the flash lightened every piece one shade.)

For my b-day tomorrow, Rachael made me a cake. Amazingly, as old as I feel, my car is a couple years older than I am!


For my b-day tomorrow, Rachael made me a cake. Amazingly, as old as I feel, my car is a couple years older than I am!

Quarter Horse
I installed the interior quarter panel today on the passenger side. I had already stripped and painted the metal panel and it really came out great. I also installed the fresh fuzzy window trim with rivets.

On the car, I painted the clean metal with POR-15 and then covered with Dynamat Extreme and aluminum tape on the edges instead of using the flimsy watershield.

Then I put in the quarter panels with fresh screws and a new window crank.

Mentioned in this post:

On the car, I painted the clean metal with POR-15 and then covered with Dynamat Extreme and aluminum tape on the edges instead of using the flimsy watershield.

Then I put in the quarter panels with fresh screws and a new window crank.

Mentioned in this post:
Saturday, October 25, 2008
Good Guys: Southeastern Nationals 2008

I went to the Good Guys Southeastern Nationals today at Lowe's Motorspeedway in Charlotte, NC and took about 175 pix. I tried to get a little of everything, but found myself mainly interested in the engines. Some of them were pretty amazing. Check out my photo album (176 pix).
Wednesday, October 22, 2008
Carb Crazy!

My Holley Street Avenger (Holley 0-80670 Street Avenger 670 CFM Square Bore 4-Barrel Vacuum Secondary Electric Choke Carburetor

I've only started it up to check for leaks and set the fuel float levels. It sure looks like a million bucks. (It was $513.) Hopefuly, it runs as good as it looks!
Mentioned in this post:
Spaced Out
I bought a phenolic carb spacer to keep the carb cooler. I had noticed that the car was a little difficult to start after driving for more than 15 minutes. This piece is only 3/8" tall, which is great because I have no room under the hood to raise the carb much more than that. As you can see from the photo, the spacer was more of a restrictor plate as it arrived, a little too small. So about 15 minutes later with a Dremel and a coarse grinder bit and fine grinder bit and I was in gasket-matched business. (In the photo, the brown spacer is peeking out from between the grey carb gaskets. Sorry, no "after" photo...)
Mentioned in this post:
Bad Gas

In preparation for installing my new carb from Quick Fuel Technology (more on that later) I bought a new dual feed fuel line from them.
Now, the carb I bought from QFT seems awesome, sure looks amazing. I called back to get the line and they suggested this one. It was $60 and nickel plated and looked great when it arrived in the package. I would have been happy to spend more and figured whatever they had would have been about $100.
Unfortunately, there were some issues with this thing. In no particular order, the line was -6 instead of the -8, which was already on my car (not a huge problem); the threads on the extensions that go into the fuel bowls on the carb had some small nicks, which made hand-threading difficult (not a huge problem); and one of the flanges had some sort of dent in it which can't be good for a fuel-tight seal (getting worse). Oh, did I mention the load of metal shavings loose in the line from where the gauge hole was drilled and tapped? (Good grief.)


Fortunately, I looked this stuff over before instantly ruining my new carb on start-up. I sent the line back to them tonight and will re-use my old one.
Thursday, October 16, 2008
Free Car Parts! Well, Not Quite...
Ok, so they aren't free. But they are car parts. Lots of them. I opened the Official "Performance & Style for Your Pony" store today. Woo hoo! I've bought a number of things for my car from Amazon. They have great deals on Dynamat, and even Holley carbs, and usually free shipping and no tax to boot. No kidding! Check it out.
Thursday, October 9, 2008
Is This What They Had in Mind?

The stock dash lights on these old Mustangs appear dim and green. What's odd is that there are 4 of them in the cluster and they are pretty bright on their own, but they don't light up the gauges too well. There's also a blue plastic "diffuser" that each bulb fits under, but still they appear green--even with all new stuff. I think it's because a yellow incandescent bulb and a blue diffuser equals a green light.
Enter the LED... I bought a kit of blue LEDs (and a couple clear ones) for replacing the dashlight bulbs for about $25. I used this opportunity to grease the speedo cable behind the dash too. (Sorry for the poor pic though.)
The clear turn signal bulb sockets were kinda loose and the bulbs were springing out, so I took some pliers and gently squeezed the sockets where they were grooved for the bulbs. This caused the stops on the sides of the bulbs to catch and hold the sockets better...
Saturday, September 27, 2008
Cruisin'

I waxed the car last night for the first time since getting it back from the paint shop a few months ago. It came out pretty good for the short time I had in it. (I'm going to ask the glass guy to add some more sealant around the front and rear glass to stop some small leaks.) Took it out today for a cruise since the weather was so nice. It's enjoyable even though I'm thinking of the small 'nits that get on my nerves as I drive down the road--the passenger brake light/turn signal that's out (gotta fix/replace the turn signal switch again); the clutch pedal doesn't return all the way (gotta ask the exhaust guy to get more clearance between the header and the z-bar), and of course when I back in the garage, the car promptly pukes a couple cups of coolant on the floor from the overflow (gotta buy a catch tank and fresh radiator cap). Ah, the good life! :-)
AC/DC

I bought a new 95 amp 3G alternator, along with a fused power cable and a stock wiring kit with modified voltage regulator, from PA-Performance. This will replace the 65 amp 1G unit on there now, which really can't keep up with the electric fan. Actually the fan only uses 10 amps, but at idle the alternator probably doesn't put out more than 15 amps. Along with the MSD igntion system and the relayed Halogen headlights, I'm getting about 13.1v at idle. The new alternator should put out about 60 amps at idle to maintain 14.5v. Someday, I actually might get around to installing this thing.
Brand New Repro Parts: Adventures in Head-Scratching

After I figured out my brand-new repro fuel sender float had a pinhole in it (after I installed it of course), and then replaced that, I could check out the electrical issue with the front parking lamps, which double as turn signals. To make a long story short, I was given some good advice on the forums that sent me checking the wiring behind the parking lamps. I found that the blue and brown wires were reversed on both brand-new reproduction assemblies. Un-freakin-believable. Oh well, I guess the moral is don't assume a replacement part is not defective out of the box...
The Monster Mile!
My brother, Jeff, is reporting on location in Delaware for this blog update (I should point out that my brother is the Jeff on the right below):


“It was the Dover International Speedway ('The Monster Mile') in Dover, Delaware. We got pit passes, so we were allowed
to go on the track when they were introducing all the drivers and everyone was getting into their cars, plus throughout the race, we were allowed on 'pit row' which is the area right behind all the pit crew stations."


" I was standing about five feet away when Jeff Gordon climbed into his car and his crew was getting him ready for the race. There were more than 100,000 fans in the stands. It was so incredibly LOUD, I couldn't believe it--thankfully, I had bought earplugs outside...”
I've never even been to a NASCAR race. Maybe someday I'll go... Nah.
Friday, September 12, 2008
The $9500 2009 Corvette...
Ok, my buddy Bryan paid more for his 2009 Corvette than simply the $9500 check he handed over to GM. In fact he also traded in a 2005 Corvette with 12k miles. In case you are wondering, that's a smokin' deal. He was the original owner of the 2005 and it was in the shop about 20 times for all sorts of problems. So he returned it—under his state Lemon Law. Woo hoo! Here's the 2005:

And here's his new 2009:

The hood ornament on the 2009 is actually his uncle who went along to pick up the new car at the National Corvette Museum. Props to Bryan for returning a turd (and to GM for taking it back.)

And here's his new 2009:

The hood ornament on the 2009 is actually his uncle who went along to pick up the new car at the National Corvette Museum. Props to Bryan for returning a turd (and to GM for taking it back.)
Uptown Package Tray

I bought some extra vinyl, like the kind and color used for the seats, and covered the package tray. The tray is just a pressed board of some sort, not fancy at all. Trimmed it and tucked it under the rear window seal for a tight fit. I actually do have a couple speakers back there, not sure how they'll sound, but I may not even install a stereo anyway...
Tuesday, August 26, 2008
"There's Something About a Mustang..."
Jay Leno has a website at www.jaylenosgarage.com that features some of his vehicles. One of his vehicles is a '65 Shelby GT-350. He drives it around in a short video, and the site features tons of videos of his other cars too. Check it out!
Sunday, August 24, 2008
Odds and Ends: Part IV


Lots of various items done recently: new alternator and regulator trying to chase a charging issue. Might be the underdrive pulleys, but I'm going to add some grounds on the battery and the alternator to be sure. Painted the gold alternator fan black.
Replaced the crummy black-oxide bolts in the engine bay with the left-over zinc-plated ones I used on the body panels.
Also installed a new fuel sender since the one I installed already was bad out-of-the-box. Two tips on that: put the brass float in a cup of water for 10 seconds or so before installing the sender in the tank and look for bubbles to tell if there's a pinhole in the float. Otherwise the dash gauge will read empty the day after installation... And use some thick grease to hold the rubber gasket in place if the tank is upside down as you install the sender, otherwise it's a huge hassle.
Oh, also installed some LED reverse lights from Mustang Project. And bought their blue LED dash light kit, but haven't installed yet. (Update: I can't get the reverse lights to work, so I removed them...)
Lastly, I signed up for Hagerty insurance to make sure I'm covered if something happens.
Sunday, August 10, 2008
Exhausting, Yet Electrifying...

I picked the car up yesterday from the muffler shop. He did a great job getting the Magnaflow exhaust to fit. The fuel tank required some persuasion to get the tailpipe around it safely, which I was expecting to some extent. Sounds good too, much quieter but still a good rumble when I get on it.
I almost forgot: we start the car and after 5 seconds it starts to smoke, and I mean smoke out of the exhaust. We wait ten minutes and it's still smoking, maybe worse. I decide to pay and leave after we figure the pipes have some oil or grease in them from manufacturing and assembly and it should burn off. Maybe a quarter mile from the shop with a huge plume of smoke from the car, I get on it and see an object shoot out one of the tailpipes and roll along the highway with blue smoke all over it. I think a shop rag or something ended up in the pipes and burnt up before getting ejected out the back. Problem solved, and in spectacular fashion no less! No more smoke.
With the fresh battery in the car, I swung by Advanced Auto Parts and they tested the alternator on the car, just to see if I had figured out the electrical gremlin from the other day. Wasn't putting out enough voltage and actually dropped when I revved the engine. Hmm. I bought a new regulator for $15 (to replace the other new one) and swapped it on. Brought the car back to them, after the swap and after trickle charging the battery, to check the alternator. The battery has 12.5v at standstill with car off vs. 11.5v yesterday. With car running at idle the volts were still 12.5 vs. 11.5 yesterday. I decided to rev the engine to 2000rpm and sure enough the volts went past 14, unlike yesterday when they dropped with higher rpms. So partly, I had a bad regulator.
But also it appears that the March underdrive pullies don't charge the battery suffieciently at idle. Not sure what to do here yet. But definitely keeping the jumper cables in the trunk!
Friday, August 8, 2008
Chris' and James' Excellent Adventure

It was supposed to be simple. But just like Harold and Kumar on their way to White Castle, things aren't always so simple... I had a 9:30 appointment at RJs Muffler and Custom Piping shop in Raleigh this morning.
My buddy James was in his pickup and I was in the Mustang. The drive down the highway was great, kinda loud, but the car had great acceleration. A bit of vibration on hard acceleration, not sure if it is motor mount- or driveshaft- or rear pinion angle-related yet.
We get to the shop after 15 miles or so, but nothing, no shop. RJ moved--in the past two months. We call him but he's not answering.
So we drive home. As soon as I arrive I call RJ, and get a hold of him. He gives me the new address and James drives back to my house.
I hop in the Mustang, turn the key, and nothing. Hmm, maybe that's why the tach got all funky on the drive home? So we jumpstart the Mustang and I hit the road.
Ten minutes into the trip I see the Temp gauge climbing towards "H" with no electric fan running. Yikes! I pull over in a parking lot. No fan. Let it cool for a few minutes and try to start it. Nothing. We try to jumpstart it. Nothing! I figure the car has been driving on the alternator since the battery was so dead. The electric fan is hooked up to the battery and solenoid directly, so I think that's why it didn't come on the first time, but we'll see.
We pull the battery, leave the car open with no windows in some random office parking lot, we set off and find a NAPA four miles away on James' iPhone. Go there and exchange the sealed Orbital battery (free!) and drive back to reinstall. Goes right in, turn the key, and starts right up. Backing up, my shoe slips off the clutch and I catapult backwards before it stalls out. (Gotta get this thing insured!)
So we get to RJs at noon (!), and spend some time walking around the area to kill time. We drop off James' truck at Dent Wizards to get a door ding removed for $99. We buy (cheap) food at Cookout after standing in line for half an hour. We check out Priscilla's adult store next door to Cookout after driving by it for years and not stopping. (Seems to cater to the ladies mainly.) We drive go-karts at Adventure Landing. I get whiplash when some 80-pound kid barrels his kart into the back of my kart as I was parking in the staging lanes when we all were done. We go back to RJs, but he's gonna need more time... So RJ has the car tonight, and I am supposed to get it back tomorrow. Woo hoo!
Sunday, July 27, 2008
A Few More Tasks Done...

I installed the bolt-on hood scoop with a scoop grill that matches the 66-style grill. The holes were already drilled before paint, so this decision was made a long time ago. IMHO it breaks up the large hood visually. Someday I will cut a hole in the hood to make the scoop functional... Also installed the driver's kick panel, which required some trimming to fit with all the sound insulation I've installed. And then installed the driver's side door weatherstrip. So I guess there are now two small "gotchas" with these reproduction doors. There should be two holes for the plastic plugs on each end of the weatherstrip. One hole was a little too big and the other hole was missing. I used my old doors as a template to see the right size hole and to locate where I needed to drill the new hole. All the lock mechanisms and rods went in great a couple weeks ago. The real test for these doors will be when the glass guy installs the glass...
Friday, July 25, 2008
Am I Done Yet?


The glass guy stood me up today, so that was a bust, but did get the hood installed after about an hour of messing with it. Painted both door interior panels with final coats. Also washed the car with a wet rag to get all the fingerprints off. Took it around the block. Maybe a few more weeks of finishing touches... Woo Hoo!
Subscribe to:
Posts (Atom)