Showing posts with label reassembly. Show all posts

Monday, March 3, 2014

Project StinkBug: Open Wide

A milestone day last week as the new crate 350 dressed in '57 accessories was mated to a rebuilt turbo 350 transmission and a higher-performance torque converter. I painted the transmission cast gray, which if I read the detailing materials correctly, was one of a couple correct colors for the transmission (usually a two-speed Powerglide) that year.

The transmission has a polished and finned pan on it, which probably isn't correct, but it looks good and seems high quality and leak-free. All the other bits and pieces, such as the dipstick tube, kickdown cable, etc. will be replaced for new.

Hopefully, I don't see this sight again for many, many years...
I found a stock-appearing flywheel cover (in black with no vents), and we will bolt that on shortly, along with some new linkage pieces to get the turbo 350 to work in this car.

With the radiator core support removed, the engine and transmission pretty much go right in, but the firewall area is a tight fit.
I'm hoping to have another evening or two to work on the car before shipping it back to my house from Josh's garage.

Mentioned in this post:

Friday, January 18, 2013

Trunk Weatherstripping: Save a Few Bucks?

Here's a quick post about another "re-do" that cost me some time and a little money.

There are some threads online about replacement weatherstripping not allowing the trunk lid to close fully. I also had bought the "cheaper" weatherstrip a few years ago when my car was coming back from the paint shop. After I installed the weatherstrip, the trunk lid never sat properly and no amount of fiddling with the trunk lid helped. Some folks suggested giving it some time to settle. Nope.

Years later I decided to buy the better weatherstrip and do the job right. I'm actually surprised the larger mail order places even sell the cheap weatherstrip. If it doesn't allow the trunk lid to lay down properly, the weatherstrip is not fit for its intended purpose. Don't sell it.

Here are the two weatherstrip offerings from NPD. The better one on the left. El cheapo on the right (aged on the car a few years). The price has continued to drop since I bought mine in 2008. My suggestion is to avoid the headache and buy the better weatherstripping.

Mentioned in this post:

Tuesday, November 10, 2009

A Not-So-Instant Replay: The Finale

I finished adjusting the gaps the other day. In addition to making the gaps better, I realized that the OE lower windshield trim now fits, both side windows fit better (perhaps the best they can ever get), I tightened the front bumper bolts that weren't tight enough (oops!), and the doors shut fantastically.

If the car hadn't been painted already, I could have tightened the gaps a bit better—but what's done is done. Everything considered, this task was worthwhile.

Driver's side:


Passenger's side:


(I should mention that the flash is brutal and lights up the voids considerably. Looks better in person!)

Sunday, November 1, 2009

A Not-So-Instant Replay: Part IV

I'm finishing up the tightening of the door and fender gaps. I was side-tracked the past couple weeks with painting a garage for a friend.


But I have two quick pix of the fender bolts. The bolts show the marks left by the previous fender position about 3/16" forward of the new position. I was also able to install the bottom OE window trim that would not fit previously since the fenders were positioned too high and forward.


The passenger fender moved back a bit further than the driver's side. I already used a bit of touchup paint to hide the marks on this side...

Sunday, October 18, 2009

A Not-So-Instant Replay: Part III

I got the doors fixed up this weekend, adjusting the door-to-quarter gap for width and flatness, as well as the door-to-rocker gap for consistency and flatness. When the hinges were moved (pretty considerably), I then put a steady bead of permanently flexible, clear silicone along the top and leading edge of the hinges for waterproofing. (Originally, this area was covered in factory "goop" brushed on to seal it before paint.)


The worked gaps are much better now, and the doors open and shut just great, particularly the passenger door. On the passenger door I also was able to close that gap by the handle pretty well. Since the door was too far in at the upper left corner, I loosened the hinge bolts on the door and pushed in the lower right corner. The lower right corner was a little too far out anyway, and this popped out the opposite offending edge.


The funny thing is that the side windows are perfect now. They fit just great without any modifications. They were a bit sloppy before, but moving the doors tightened the window gaps just right.


And a photo of the rest of the parts (not including the bumper).

Monday, October 12, 2009

A Not-So-Instant Replay: Part II

It actually didn't take long to get to this point. In addition to the removal of what you see in the pix, the interior door panels and kick panels are removed.


I tried to remove pieces in big "chunks"—such as the bumper with brackets attached, and the grill with the surround and headlight buckets attached. Hopefully, I can get it reinstalled like that too. :-)


 If there are no surprises I hope to have tighter gaps and a re-reassembled car here in the next couple weeks.

A Not-So-Instant Replay: Part I

Since I reassembled the car there's been something bugging me. Well, a few things actually. The gaps around the doors weren't particularly tight and this caused the fender gaps to be too loose. In fact, besides looking lousy to someone who knows classic Mustangs, the panel misalignment caused the front windshield trim to fit poorly (and the original piece of lower trim does not fit at all.)

I was reading a classic car magazine the other day and in the classic car auction recap pages, the author mentioned a car at auction with "panel gaps so big a squirrel could fit through." So, that was the last straw! :-)


The passenger door is twisted a bit too—too far in at the handle area and too far out at the front lower corner. The passenger fender is too far forward so the headlight trim doesn't line up. The fenders are also too far out, needing to be brought closer to the hood. Speaking of the hood, it can be brought back towards the cowl when the fenders are right.


When I reassembled the car I used the pilot holes the body/paint guys drilled. Frankly, I didn't know any better at the time and was probably anxious to get the car done. :-) Now, I will be closing as many gaps to 1/8" as I can (except for the front door gaps—maybe 3/16" on those.) Right now all the gaps are at least 3/16" and one is 1/4".


I've been finding plenty of old photos online of original Mustangs and they really had good gaps from the factory. I don't know where these old cars got the reputation for poor panel gaps from the factory, but I haven't been seeing it.


Sunday, December 7, 2008

Brand New Repro Parts, Part II: More Adventures in Head-Scratching

Here's an issue that has caused me to waste some time, so maybe this tip will help somebody else. I bought a new fuel tank sending unit for my new 22 gallon fuel tank. (This tank is from a 1970 Mustang and holds more fuel than the stock 16 gallon tank from 1966.) The sending unit was from NPD and is supposed to be a good quality one with a brass float and 3/8" line. I think all of the parts houses will have this same issue, so I don't think NPD could do much about it.


Anyway, the first two floats failed by filling with fuel, causing the gauge to always read "E". The first floast failed within one day, and the second within one month. I finally replaced only the brass float and not the whole repro sending unit. At left is the brass float I ordered from NPD, and it came in a Ford package, which was a nice surprise.


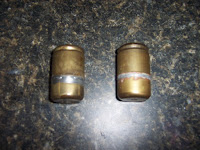
And here are the two floats together. The import is on the left and Ford is on the right. They seem reasonably close to being the same, but notice the soldering (or brazing?), which is more controlled on the Ford one.


And here's the failure point of the import on the left both times (the first time there was a leak on the side too): the solder on the end cap looks like a big porous blob stuck on there. The Ford float has solder that is accurately placed and very smooth for leak-free service.

As a matter of fact, the import sending unit design apparently has another issue that quickly happened to 
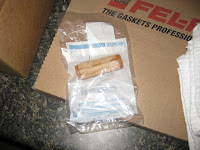
both units I bought: The white plastic sock that is stuck on the intake tube to keep debris from getting sucked into the fuel line actually fell off or melted off and is presumably lost in the fuel tank somewhere. (With a new tank and a fuel filter before the fuel pump I'm not really worried about that right now.) But the parts houses do sell a NOS sending unit filter or sock for about $22. I just bought one and will install it when I have a chance (see photo). [Edit: Just installed it a couple months ago!]


In hindsight, I'd use a NOS brass float ($7) and NOS sending unit filter ($22) that are available in Ford packages from places like NPD and Mustangs Unlimited. Then I'd buy a $25 repro sending unit and hope for the best. I would not use a repro sending unit again without upgrading the sending unit filter and float. Of course if you can score a NOS sending unit assembly for $50 that's the best bet, but these go for over $100 easy when they come up on eBay.

Sunday, November 30, 2008

Odds and Ends: Part V


The glovebox door has been loose since the day I got the car. I am reluctant to replace it since it is the original and even sports some car care service station stickers from the 1970's on the back.

The self-tapping screws and the holes they thread into are stripped, so I used machine screws, cut to length, as studs and epoxied them into the door. Then I used nylon lock nuts to secure the door. This works better but probably isn't a permanent fix. I wouldn't use lock nuts if I were doing this again; they thread too hard on the stud.

The photo shows the stock screw at left, and the new washer and nut at right, with the epoxied stud in the background. [Update: I've given up on this idea in recent months... I hogged out the holes with a drill bit and used larger screws to hold the glovebox door tight.]

Sunday, November 16, 2008

Mission: Accomplished

The other day I dropped off the car with my painters so they could tweak the passenger door hinges. The door had sagged a bit when the glass was installed, and readjusting the door while the car is fully assembled is really a three-person job.


After I got the car home I installed the last door panel on top of a layer of Dynamat Extreme (to act as a watershield.) I was happy to install the final part on the car.


Of course, I will fix a few things here and there, but my pile o' parts to put on the car is now gone. Woo hoo!


Sunday, July 27, 2008

A Few More Tasks Done...


I installed the bolt-on hood scoop with a scoop grill that matches the 66-style grill. The holes were already drilled before paint, so this decision was made a long time ago. IMHO it breaks up the large hood visually. Someday I will cut a hole in the hood to make the scoop functional... Also installed the driver's kick panel, which required some trimming to fit with all the sound insulation I've installed. And then installed the driver's side door weatherstrip. So I guess there are now two small "gotchas" with these reproduction doors. There should be two holes for the plastic plugs on each end of the weatherstrip. One hole was a little too big and the other hole was missing. I used my old doors as a template to see the right size hole and to locate where I needed to drill the new hole. All the lock mechanisms and rods went in great a couple weeks ago. The real test for these doors will be when the glass guy installs the glass...

Friday, July 25, 2008

Am I Done Yet?


The glass guy stood me up today, so that was a bust, but did get the hood installed after about an hour of messing with it. Painted both door interior panels with final coats. Also washed the car with a wet rag to get all the fingerprints off. Took it around the block. Maybe a few more weeks of finishing touches... Woo Hoo!

Thursday, July 24, 2008

Show Me the Door


I began painting one of the door interior panels today. My painter accidently painted the door interior panel with 2 coats of Dupont basecoat a few months ago, thankfully I caught him before he cleared it with activator. So I scuffed it and shot it with lacquer primer and lacquer Medium Blue Metallic to match the dash and rear quarters. I put one more coat on after this photo was taken and frankly it could use another, which I will do this weekend after the glass installer does the side windows (in case the interior paint gets scratched).

Busy Day!


I added the headlight extensions, surrounds, headlights, and grill components today. Then I added the bumper which required three pairs of hands to get it all aligned and installed without scratching anything. The pony emblem is from the fender, but installed on the grill instead like Shelby did back in the day. I should mention that this front license plate is the original California black plate from when the car was new back in 1966 and has been on the car ever since. The plates stay on California cars even after they are sold to somebody else, until they leave the state. I will keep it there.

Now We Are Looking Like Something...


The doors, fenders, and trunklid (which needs a small adjustment) are on, and I just finished installing the front valance and stone deflector above it. There's a seam that runs down the side of the car all the way at the bottom. I taped off and undercoated that seam so it wouldn't catch so much light and look ugly. On the front valance pic you can see the silver zinc-plated bolts. I just picked up my final batch of hardware from Surtronics, but this batch wasn't as smooth and nice as past batches. The finish appears a bit rough and dull. Not sure what the reason is for that. Also I had previously replaced the headlight harness and all the other wiring on the car except for the main harness, which was in great shape. I also added a Drake headlight relay harness that should brighten the already-brighter halogen Sylvania headlights considerably...

Friday, July 4, 2008

Lots o' Parts


I took these photos before I left on a trip about two weeks ago (in case the house burned down and I needed to show the insurance company what was in the garage.) Fortunately, the house and everything else were still there when I returned.