Saturday, December 28, 2013

Project StinkBug: Grime Time

In my spare time the past few weeks, I've been completing a pretty nasty task: cleaning and refinishing the undercarriage. By the looks of things, the undercarriage was completely original, and with a (pre-PCV system) draft tube venting engine oil vapor below the car, it was a grimy mess.

I had started cleaning things by the time this photo was taken, but the frame and floors were caked with dirt and grime.

After hours of work with a simple paint scraper and a Harbor Freight angle grinder using two wire wheel attachments, I could see bare steel with remnants of the original red oxide primer (by now a chocolate color). In the upper left, you can see the floor before I removed the grime.

Fast forward at least 20 hours of filthy work under the car, and three cans of Seymour red oxide primer, and I ended up with this...
and this...

and this...

and this. I used some simple Rustoleum Satin black spray paint on the frame, after cleaning thoroughly with 3M adhesive spray cleaner. (The front floors are a bit "drafty" — so some metal replacement is in the near future.) I also replaced the rotted body mount cushions with some black Energy Suspension pieces. And coated certain areas with 3M undercoating as original.
I used the opportunity to clean up the rear axle and rear suspension pieces. I used cast coat grey and satin and semi-gloss black where called for in the manuals for an original-style restoration.


I'm mostly done with the rear axle here, except for the rear brake cable, which is in the tumbler.

Here's the brake cable in the Harbor Freight tumbler before I poured in the glass beads and liquid degreaser. (Took a couple years before I found out that you add water or degreaser to the tumbler basin or it won't clean anything...) It comes out clean, and then I hose off and spray can clear it when dry.

And ready to go under the car. I was exhausted at this point and didn't realize it wouldn't roll under the car, which was on jackstands sitting too low... lol


Mentioned in this post:


Tuesday, December 3, 2013

Project StinkBug: Motorvation!

Over the past couple months I've been focusing on Project StinkBug, trying to move forward on three fronts: powertrain, underside, and prep/paint of recently acquired body pieces (hood, trunklid, etc.)

This update will explain the engine portion of the powertrain upgrade.
The original 283 looked like the heads were rebuilt before putting the car away 20 years ago. But I could see the short block was old and tired with mirrored cylinder walls and .060 over pistons already, limiting my rebuild options.
I found a buddy to help me out at this point in the StinkBug project. Josh has the knowledge and facilities that complement my own. He removed the engine in his home shop and found the block in need of cylinder sleeves. But the cost would be prohibitive...
Hmmm... A brand new GM motor for $1500 shipped. And with a three-year warranty. I figured it would perform better than a rebuilt 283, for almost half the price. (I won't achieve the 260hp/350tq rating with this combo running vintage parts.)
A week later, the new 350 shows up at Josh's home shop. In keeping with the "classic" theme of the car, I wanted this motor to look like a 283 from '57, even if I had to give up some performance.
A red 3M pad to scuff the black engine, and a can of orange engine paint, gets things rolling in the right direction quickly.
The '57 Power Pack intake with oil fill tube installed. New short water pump (painted orange) installed as well.
These '57 valve covers are way too neat to leave behind. I painted them orange and added a silver Chevrolet script over the raised letters with a stencil kit.
At this point, the rest of the new or refurbished items were added: the original rams horns exhaust manifolds, original generator with new brushes, new Blaster 2 coil painted black (with tilted coil stand for larger 4-barrel air cleaner), original distributor (with Pertronix conversion), original fan, water pump pulley, and fresh NOS Delco ignition components. That's the '57 Carter carb from Craigslist on top. We also added a slim 6" $60 PowerForce balancer and $30 steel crankshaft pulley, to replace the riveted stock pieces. These fit like stock while keeping the new fan belt in alignment.
I'm really happy with the progress so far. There are some bosses and casting stamps and a late-model timing tab on the new motor that look out of place for the 1950s of course, not to mention the side motor mount attachment points (which I won't be using). But overall I think this new engine will stay true to the look I was going for and with a sensible price tag. I really like reusing vintage parts where it makes sense too.


Mentioned in this post:


Sunday, September 15, 2013

Project StinkBug: Laying Down the Green

It took a while, but I finally was able to learn the name of the light green color for the various dash bits including the instrument cluster, steering wheel and steering column collars. It's called Surf Green. I had thought it was Sea Foam Green, but after buying a spray can of lacquer I realized that SFG is more of a light turquoise. Surf Green is the right mint green for a 1957 Chevrolet.

A 12oz. can will easily do a full complement of dash pieces seen here if they were originally green and you are putting 2-3 light coats of new paint on top of prepped old paint. You can probably make do with one can if you are starting with primed pieces too.
At first I didn't want to repaint the instrument cluster because it had the original paint, but it had a number of chips and issues. I'm very happy with the results though. I also took this opportunity to use a silver chrome paint on the backs of the gauge faces and gauge housings for better gauge lighting.


Mentioned in this post:

Thursday, August 1, 2013

Project StinkBug: Put a Lid On It

When I bought StinkBug, one of the missing pieces was the trunk lid. The trunk lid I needed was specific to the four-door sedan Bel Air. While I could buy a new one all day long online, I really wanted an original one, stamped in the 1950s here in America. I'm not adverse to using repro parts—used them where needed on the '66 Mustang—but IMHO classic cars should be mostly original pieces, or they really aren't classic...
Here's a local find... For 150 bucks, I figured I'd give it a shot.
I had used chelation rust removal fluid about 5 years ago on my '66 Mustang. I removed and soaked the doors in it, like you see the trunk lid here. This time I used a product I read about here—as well as 10mm plastic sheeting, which held the chelant safely for days.
After a couple days of soaking in 90 degree weather, I had complete rust removal. I haven't decided how to fix this area yet, but it's now primed and waiting...

Mentioned in this post:

Bullitt v2.0 Gets New Heads, Stage II Cams, More

Although the Bullitt put down good power, the recently-rebuilt engine needed some sorting. The engine had been detonating at high rpms, since I first bought the car. Changing the tune didn't fix the detonation, so the engine problem was likely internal.

Fortunately, Piedmont Custom Motorsports is just down the road from me. I hadn't had a chance to work with PCM previously, but I'm fortunate that they know Mustangs of all years and were eager to help me.

PCM found that the power level was actually low—for the surprisingly high 19psi of boost. Reinstalling a stock larger blower pulley for a more reasonable 13psi resulted in a big drop in power. And a leak down test showed poor engine sealing. At this point, the motor came out to have a closer look.
The heads showed previous detonation damage/repair around the spark plug holes.
A new threaded insert on one spark plug hole could be introducing a hot spot into the combustion chamber.
In addition, not all the valves were sealing properly.
PCM dropped the engine/crossmember/trans out from below.
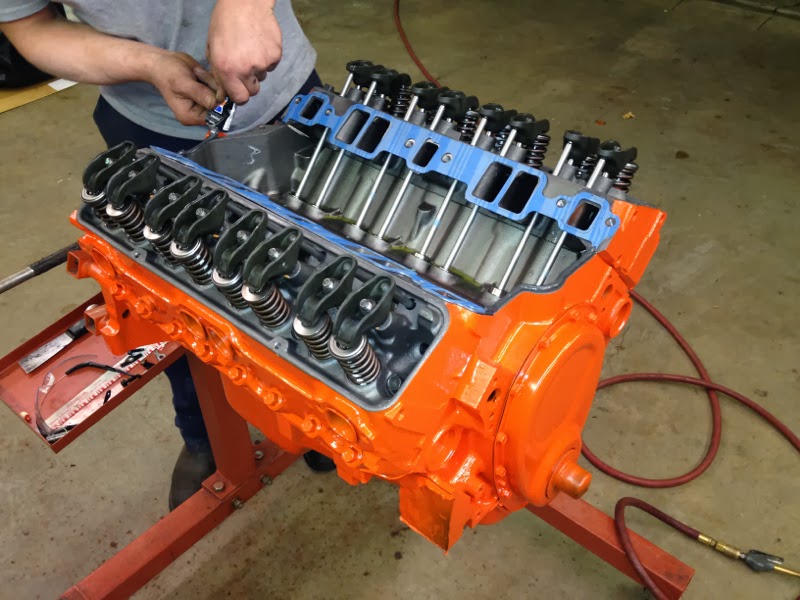
PCM hooked me up with a set of stock replacement heads in great shape for only $300. The machine shop properly cut the oversize valves from the original heads and installed them. At this point, I figured the upgrade to Stage II cams was worthwhile... :)
While the Bullitt was in surgery, I figured I'd clean up the intake. I spent a few hours disassembling, cleaning, and painting...
And I ended up with this. The end-of-day lighting is harsh in this photo...
Here's the intake on top of the motor at PCM. They also installed a Centerforce clutch and adjustable quadrant for me.
Here's a video of the dyno, showing 533hp at only 13psi.


Mentioned in this post:

Wednesday, July 31, 2013

Project StinkBug: DentWorks of Raleigh

I've been a fan of paintless dent removal for about 15 years now. Some jobs are perfect for PDR, and a pretty good ding on the '57 seemed like one. Old cars can be tough to fix this way, however, since long expanses of original sheetmetal is thick, and there aren't always access holes nearby
DentWorks of Raleigh fixed a good-size ding on the rear quarter of the '57. The access hole was conveniently located nearby, right where the quarter trim was attached. The ding was massaged out at my house for only $50 (in addition to the $150 to fix 5 or 6 dents on two other cars). I recommend DentWorks of Raleigh if you are in the Triangle area.

Project StinkBug: Craigslist Treasures

Today, anything you want is just a few mouse clicks away. Acquiring various car parts for a restoration of a popular classic car is not the daunting task it used to be.
I knew that the hood, trunk lid, and steering wheel were missing from having the car painted decades earlier. I found a nice original hood (middle) on Craigslist. This parts seller also had an original orange steering wheel he threw in for no extra cost—left over from his restoration.
Probably my most amazing Craigslist find, and this happened days after I got the '57, was this original PowerPack intake manifold to replace the wheezy two-barrel on the car now. I think the original 4-barrel Carter carb (that I found locally days later) only flows about 400cfm on this manifold, but should be plenty for a 283. This intake was a smoking deal at only $50. :)

Project StinkBug: I Brake for Restomods

I decided to leave the brakes as the stock non-power drums on all four corners along with the single pot master cylinder for a stock appearance. But I'm in the middle of replacing everything for safety.
The crusty original brake and suspension pieces needed an overhaul, but fortunately (non-chrome) parts are generally cheap for a '57 Chevy.
After replacing the brakes, cutting the stock springs, adding new shocks and more, plus cleaning and painting everything satin black, the job is looking better. The spare parts pile included aftermarket front and rear anti-sway bars from 20 years ago, so I installed them where there weren't any originally. I used brake shoe self adjusters (and some steering linkage pieces to replace bent idler arm and tie rod ends not shown) from another Craigslist score.

Project StinkBug: Instrument Cluster Rejuvenation

One item that I really liked about this car was that it was owned by the same person since the late 1980s. And had another long-term owner before him. It was also sporting the original 283" engine. And it was a real Bel Air, not a 210 with Bel Air trim. There aren't many '57 Chevys around, and I really dig the potential.

I was fortunate that the original gauges were present, and the spare parts pile did include some replacement lenses.
I spent a few hours disassembling and cleaning/polishing the cluster and was left with this. The fresh lenses and new orange paint on the needles helped a lot. Extra fine steel wool on chrome works great.


Mentioned in this post:

Introducing Project "StinkBug"

A few months ago I decided to take the plunge on another classic car. I was looking for a project, and wanted something with a V8, an automatic transmission, and four doors. Basically a cruiser with some chrome and a dual exhaust...

I found a '57 Chevy Bel Air on Craigslist out-of-state and decided to take the plunge. This car was disassembled 20 years ago for paint and never reassembled afterwards. I didn't want to deal with having a car sitting in paint jail for any length of time, and never wanted to pay for a paint job again—so this deal was interesting.

Over the past few months since I've owned the car, the parts bill has climbed higher than I was led to believe as many parts have either turned up missing or are in poor condition and not useable. Not to mention finding the small pile of spare parts absolutely covered in stink bugs. With that said—enter Project StinkBug! :)

Here's StinkBug sitting on my driveway after I had a flatbed deliver it to my house—275 miles away! I really like the old school Cragars even though they are 15". I don't like the 21-year-old tires though.
Here she is as I started taking it apart to assess, fix, and replace various things. The radiator was first to go. It was the original Harrison unit, and I found a local shop to recore it. I want to keep this car pretty original if I can, but with a mild Restomod theme.
The interior was disassembled to paint the dash long ago. Fortunately most of the stainless and chrome was present, and I just needed 5 or 6 replacement pieces.


Mentioned in this post:

Friday, January 18, 2013

NitroPlate: Another Great Experience

The Bullitt has been a great car, and I've really enjoyed driving it. Probably the only area that needed a little aesthetic attention was the headers and h-pipe. When one of the headers and the h-pipe each developed a crack that needed welding off the car, I had a chance to enlist NitroPlate to refinish the headers. I tried to clean up and refinish the h-pipe myself.

Before: Yikes! Too ugly for the Bullitt. But they are JBA mid-lengths—so they are very good quality overall with a thick flange.
After: I'm digging the bling factor—not to mention the increased heat retention. The service to bead blast, bake-to-clean, and ceramic coat was $200. Shipping is tough at $80 round trip (and only NC to TN!), but NitroPlate can't help that.
The JBA h-pipe and SLP converters couldn't be NitroPlated (the extreme heat in the process would ruin the converters), so I cleaned the pipes by hand, and painted them with black exhaust paint. Not sure it will hold up, but they looked pretty good at that moment. :)


Mentioned in this post:

Trunk Weatherstripping: Save a Few Bucks?

Here's a quick post about another "re-do" that cost me some time and a little money.

There are some threads online about replacement weatherstripping not allowing the trunk lid to close fully. I also had bought the "cheaper" weatherstrip a few years ago when my car was coming back from the paint shop. After I installed the weatherstrip, the trunk lid never sat properly and no amount of fiddling with the trunk lid helped. Some folks suggested giving it some time to settle. Nope.

Years later I decided to buy the better weatherstrip and do the job right. I'm actually surprised the larger mail order places even sell the cheap weatherstrip. If it doesn't allow the trunk lid to lay down properly, the weatherstrip is not fit for its intended purpose. Don't sell it.

Here are the two weatherstrip offerings from NPD. The better one on the left. El cheapo on the right (aged on the car a few years). The price has continued to drop since I bought mine in 2008. My suggestion is to avoid the headache and buy the better weatherstripping.

Mentioned in this post:

Back in Black

Recently, I decided to change up the appearance of the '66. I didn't want to spend a lot of money on it though. I wanted to do some side stripes and wanted to change the look of the wheels. Ultimately, I added vinyl black side stripes and painted the wheel centers gloss black.

For the stripes I went with side stripes for a '67-'68. I wanted taller stripes and not the thinner GT-style stripes from '65-'66. I bought these from one of the mail order places for only $20. When I installed them I didn't wrap them around the edges of the panels, trimming them about 1/8" away instead. On the front fenders, I trimmed the stripe at the beginning of the wheel arch rather than up to the edge of the wheelwell itself.

To paint the wheels I bought a can of Rustoleum gloss black paint (to supplement a partial can I had on hand.) My Vintage Wheel Works wheels have coarse aluminum centers, but I had already added some silver paint a few years ago, since they had taken on a gold-tone over the years.

Ready for paint: I bagged each wheel and covered each lug hole with a coin. When taping the wheels I simply trimmed the edges with the edge of a razor blade—and did not have to follow the circular edges with dozens of pieces of tape around the wheel.
Side 2: In addition to cleaning the wheel before paint, I used a red Scotchbrite pad to scuff the surface to allow the new paint to adhere properly.
Three coats later...
Ready for the car...

Black stripes and black wheels installed. :)


Mentioned in this post: