Monday, July 27, 2015

Project StinkBug: Headliners 'n Windlace! Part Three

The Ciadella headliner video installation highlights the way to tug the headliner around the sides and push it behind the windlace toothed trim, as well as tacking the leading edge along the front windshield.
Here's the little money maker (buy at Harbor Freight) you can use for pushing the headliner fabric up behind the windlace trim. The tool is clean, small, smooth, and contoured - position so that it's pointing away from the trim teeth. If pointing toward them, it'll catch on the teeth and get stuck frequently. Notice the blue tape used to mark the holes for the coat hook, visors, and rear view mirror. I put screws in the holes and marked them with tape to carefully cut the headliner above them later.
Here's the cardboard sail panel with some headliner material glued on. I made sure both sail panels had the fabric match directionally, but did not feel the need to match them to the headliner itself. (It seems to match fine though.) This is a friction fit under the back glass gasket and the parcel shelf. Leave a fabric flap to let it slide under the parcel shelf.


Saturday, July 25, 2015

Project StinkBug: Headliners 'n Windlace! Part Two

Here I continue with the windlace installation and will focus on the vertical runs at the A pillar and at the C pillar.

Here's the windlace guide at the foot well. It attaches with a few screws. This should be painted body color, although I chose not to clearcoat mine, since it had some minor dings and dents. I installed the windlace while this was installed on the car, although some folks may do it the other way.
When the guide is installed, you need to make sure there's some room at the edge of the dashboard, so the vinyl flap can be pushed up and behind the dash. Bend the guide slightly to make room if needed.
Here's the second place there may be a fitment issue.
Any unneeded widening of the guide should be tightened slightly so the windlace welting fits snugly.
Here's a similar tool to what I used during the headliner installation. (More on that later.) Push the welting into the guide channel firmly and flatly. This can be time consuming to get it right.
With the welting installed, cut the vinyl flap so that it can be inserted behind the dash.
Here's the finished product. I also bought, painted, and installed a set of dash end caps, since mine were missing. I painted them with the green lacquer paint from a can (and brushed them), and sprayed enamel clear on top. It was a quick fix, but looks fine. (These were slightly rusty originals on eBay for $15 instead of the $20 new ones stamped in China last month.)
At the C pillar, there's a quarter board that is stapled to the windlace backer board along the door frame, after the windlace is stapled to it.
A quick flip of the board, and you have a nice installation. Make sure the install height is correct, and the flap fits flush when folded back.

Project StinkBug: Headliners 'n Windlace! Part One

When I bought StinkBug, the only bit still installed in the interior was the headliner. The headliner was a remnant of an early 90s aftermarket interior redo at the local upholstery shop in Virginia by the previous owner. A receipt with the car showed that the interior cost $2000 for parts and labor. (The headliner in 2015 was a mouse metropolis with poop and pee everywhere. Nasty.) The windlace was missing.

I had bought a "Ciadella" Bel Air interior kit in Black and Green from Eckler's when they were having a big sale last year. I got at least 20% off the cost of the kit, but with the extra seat belts, post boards, sail boards, and arm rests (pretty sure I bought those separately), the kit was close to $2000. Ouch.

There's a Ciadella video online that shows some of a headliner install in a 2-door, but it glosses over the windlace install and doesn't mention the similar but different 4-door sedan. Not sure why they don't do a more comprehensive video series showing how to install their kits.

Here's how I installed mine. (I'm going to highlight some areas that were not covered in the video.)

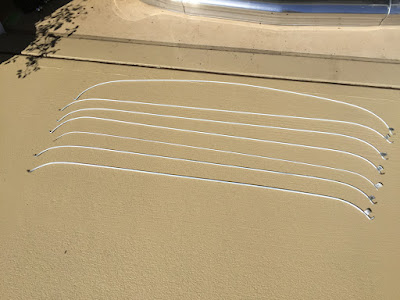
The old headliner bows need to be kept in order, so number them. You also need to clean and paint them with a glossy paint (to let the headliner slide freely on them and to stop rust).


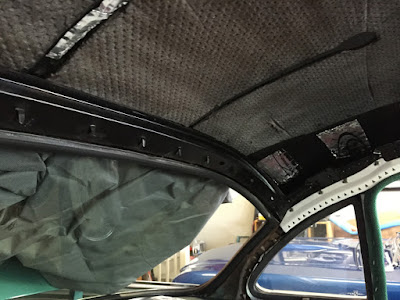
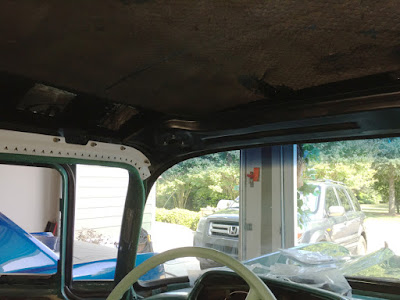
At this point, you need to install all the windlace first -- as well as run any wiring into the dome light area and door jamb switches. I cleaned and painted the underside of the roof as well to remedy the evidence of mice and to stop surface rust over time. Mark the holes (top or bottom) where the headliner bows were previously installed, even if you are painting the roof. I painted over mine accidentally...

You can use an air stapler, but I had a manual one from 20 years ago in my tool box, so I used that. (Harbor Freight has a stapler with two-sizes of staples for only $10.) You need short staples and long ones. The short ones are for the leading edge of the headliner along the front windshield; the long ones are for the windlace.
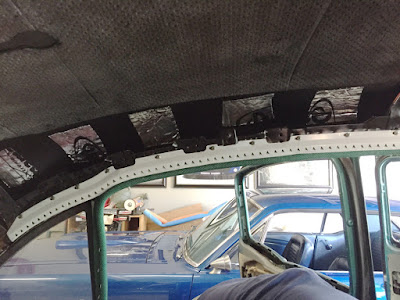
Here's the painted roof along with some strips of leftover Dynamat. The rear tangs are ready to accept the headliner board. The headliner will be inserted under the back glass gasket and the tangs tapped with a dead blow hammer to flatten them, securing the headliner. Note the windlace's toothed trim, that I cleaned and painted gloss white. It's unpainted from the factory and prone to rust.
The toothed trim follows the contour of the door and is secured by screws. The windlace is held in place along the top by this trim. You need to staple the windlace along the corners -- and vertical runs at the front and back of the windlace only, not along the post boards.
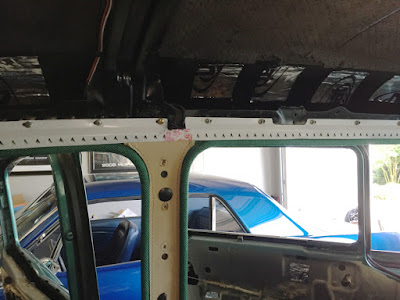
In this photo, you'll notice two areas where I deviated from stock. First, it appeared that Ciadella had pre-punched the holes in my post boards about and inch off. The only way the windlace would line up around the B pillar corners was to punch new holes. Second, I used plastic interior fasteners to tap the post boards up there securely. The factory uses metal tangs that are sometimes missing and can break easily all these decades later. I used duct tape to protect the slot in the front and rear windlace trim.
The front windlace trim has a contour that needs to be fitted well around the opening. The front windshield trim will fit up against this piece and even attaches to it. The windlace trim screws are slotted to allow for lining up the trim.
Here's the dome light plate with fresh wiring. Make sure these wires are installed correctly along the roof line, and easy to find for later fitment of the dome light assembly.
Double check that the windlace will be lined up down near the dash and front foot well, and along the rear quarter. My next posts will highlight the vertical windlace runs.

Monday, July 20, 2015

Project StinkBug: Four Doors are Twice as Much Work as Two

I've completed the two front doors on the Bel Air and will complete the two rear doors after I figure out why the rear locks don't work properly. With that said, I'm offering up the transformation of the front doors here.
The old windows had rotted rubber, tarnished trim, and window tint from the late 1980s on the original glass. The original glass wasn't safety glass and needed replacement.
All four window regulators just needed a thorough cleaning, painting, and lube to free stuck rollers. Here's the finished product. You install the regulators first (assuming your door lock systems are already installed.)
Spread out before installation on the passenger side are the window channel, vent window, and side window (both with new clear glass and new rubber.) That's also the order of assembly. Lastly, you install the whiskers on the inside and outside window trim.
Here's the fresh glass and rubber on the driver's door.
Once the glass was installed, I turned my attention to the interior door panels, handles, and interior window trim.
The factory manual lays out what waterproofing should be installed and where.

I cleaned and painted the silver access doors, cleaned up any hardware that needed it, and put strip caulk around the holes and openings.

I had some thick clear vinyl sheeting laying around, so I made some water shields. The black outlines are the strip caulk. In this photo there's a spring on the door glass regulator -- I did not use that spring, but did use the other two.

Here's the door panel installed with the original stainless accent. I used the original handles even though they were lightly pitted. (They looked vintage, which I liked.) That's a fresh armrest, since the old ones were broken. Lastly, I used the salvaged eBay window trim we had painted last year along with the original style screws. I found that replacement screws have a head that's too big to fit correctly.
I wanted to mention this issue I had with the rear door locks (that my girlfriend solved actually!) I swapped in four new door handles that had come with the car, since the originals were pretty heavily pitted. The front doors were no problem and the handles and locks worked fine. Well, I installed the two handles on the rear (where previously there hadn't been any when I bought the car) and then noticed that the rear doors were jammed and wouldn't open. Turns out that the lock plunger was a little too long and apparently needs to be cut down before installation. This is only on the rear doors. The photo shows the original rear handle on top, and the replacement handle on the bottom before I cut the plunger...


Up next is the windlace, postboards, and headliner...

Project StinkBug: Time Warp Original Interior

They say imitation is the sincerest form of flattery, but when it comes to restoring a classic car to original condition, it just makes good sense. A few months ago, I was visiting Long Island and happened upon a local car show. There was an "original survivor" 1955 sedan. With thoughts of my big interior restoration haunting my dreams, I took this opportunity to photograph the interior of this old '55.
Original headliner, windlace, and window trim.
Post board between the doors...
Quarter window trim, quarter trim panel, and sail panel.
Windlace at kick panel on right side.
Windlace at kick panel on left side.
Seeing this car was very helpful. My car was disassembled when I bought it, and wasn't complete either (missing lots of interior trim as well as some exterior pieces.) This encounter gives me a guide of what my interior should look like when I'm done...

Project StinkBug: Interior Floor Rejuvenation

Sometimes I forget just how old this Bel Air actually is...

The floors looked great -- considering they were nearly 60 years old. But the fronts were drafty, so I enlisted a body man to replace them with some Canadian stamped floors I bought online.

Here's the top of the replacement floors with fresh red oxide primer on them.
 The rears on the other hand were rust free, so I just had to clean up the top to match the clean bottom.

The rears were a poop-covered mess (the headliner had lots of mice living in it.)

A couple hours of sanding with my Harbor Freight electric grinder -- and neutralizing any slight surface rust -- and then painting with red oxide primer revealed some nice floors. I cut little strips of the final remnants of some sound deadener I had laying around, and applied it across the entire floor.

Here's the blank canvas before installing the entire interior.
Next up is the windlace and headliner install and on to the doors...

Mentioned in this post: