Showing posts with label refinishing. Show all posts

Friday, September 5, 2014

Project StinkBug: Spraying Ancient Lacquer Paint After 25 Years

I was mostly satisfied with the paintwork going on with the '57 this year, but the labor costs were adding up. And when there was a problem with the hood, and it would need to be repainted at my expense, I decided to try my hand at painting using the old acrylic lacquer paint cans that came with this car.

I bought a 21-gallon oiled Harbor Freight air compressor, and all the various bits like an air hose and fittings and paint filters from them too. I had already bought a gallon of Clear Lacquer Sunscreen and some Slow High Gloss Thinner LT-85 on Amazon. I bought a $42 spray gun from Amazon, which was kind of a splurge, when Harbor Freight guns are $10. But I liked the smaller 1.3mm tip size for lacquer. So in addition to the base coat and the clear and the thinner, which I already had left over, I spent about $275 on various things, most of which can be used again and again for years.

The challenge was trying to paint a hood to match a car that was painted 25 years ago (and I'd be using the remnants in a 25 year old paint can!) And the old paint job on the rest of the car is still great, previously wet-sanded and polished to a mirror shine. To me, the rest of the car looks like a great $10,000 paint job. So the hood had to be great, not just good. I wasn't sure I should even attempt it, but in the end I'm very happy with my results and am already planning to redo the driver's side rocker, driver's side door jambs, and rear door that my painter did earlier this year.

The painting process was straightforward, and lacquer paint was easy to deal with. I think a stunning lacquer paint job can be attained by the average hobbyist in their backyard.


The hood is all prepped, and I'm ready to lay down the green lacquer and clearcoat lacquer in my backyard. My neighbors must love me... ;)

At this point, done with the final coat of clear over the green, I really wasn't sure what to think. I thought it would have much more shine. There's 5 or 6 coats of green and 5 or 6 coats of clear. The coats were pretty thin though, so it built up slowly. The outside temperature was over 90 degrees, so the paint was drying quickly, even with 1:1 of 85 degree reducer.

I waited only 24 hours for drying and started wet-sanding with 800, 1000, 1500, and then 2000 grit paper. I really just skimmed over it quickly. Then I used a wool bonnet with rubbing compound, and a foam bonnet with 3M Imperial Hand Glaze. Most folks suggest waiting a week or longer to sand, which I'll try next time. I'll also start wet-sanding with 1000 grit or higher instead of 800.
Update: So, the clear coat on the hood was damaged two days after painting, when I placed the hood upside down (in the sun no less) to assess stripped hood bolt threads, and the heat melted the clear coat into the foam it was resting on. I ended up wet sanding all the clear coat with 600 grit, mostly where the damage had occurred, but not down to the green, and then re cleared the whole hood. It's important to not get down to the green layer or you'd have to re-shoot the green metallic. I then wet sanded with 1000 and then 2000 and then polished with a cheap wool bonnet and rubbing compound. Finished it up with a foam pad and 3M Imperial Hand Glaze. I'm surprised, but this re-do looks even better than the first attempt, and I'm comfortable with the process of fewer wet-sanding grits.


Mentioned in this post:

Saturday, December 28, 2013

Project StinkBug: Grime Time

In my spare time the past few weeks, I've been completing a pretty nasty task: cleaning and refinishing the undercarriage. By the looks of things, the undercarriage was completely original, and with a (pre-PCV system) draft tube venting engine oil vapor below the car, it was a grimy mess.

I had started cleaning things by the time this photo was taken, but the frame and floors were caked with dirt and grime.

After hours of work with a simple paint scraper and a Harbor Freight angle grinder using two wire wheel attachments, I could see bare steel with remnants of the original red oxide primer (by now a chocolate color). In the upper left, you can see the floor before I removed the grime.

Fast forward at least 20 hours of filthy work under the car, and three cans of Seymour red oxide primer, and I ended up with this...
and this...

and this...

and this. I used some simple Rustoleum Satin black spray paint on the frame, after cleaning thoroughly with 3M adhesive spray cleaner. (The front floors are a bit "drafty" — so some metal replacement is in the near future.) I also replaced the rotted body mount cushions with some black Energy Suspension pieces. And coated certain areas with 3M undercoating as original.
I used the opportunity to clean up the rear axle and rear suspension pieces. I used cast coat grey and satin and semi-gloss black where called for in the manuals for an original-style restoration.


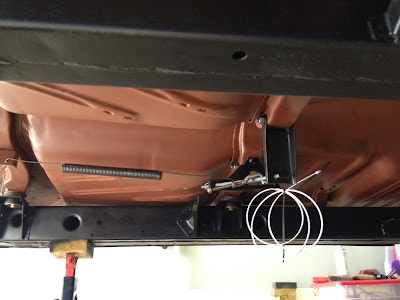
I'm mostly done with the rear axle here, except for the rear brake cable, which is in the tumbler.

Here's the brake cable in the Harbor Freight tumbler before I poured in the glass beads and liquid degreaser. (Took a couple years before I found out that you add water or degreaser to the tumbler basin or it won't clean anything...) It comes out clean, and then I hose off and spray can clear it when dry.

And ready to go under the car. I was exhausted at this point and didn't realize it wouldn't roll under the car, which was on jackstands sitting too low... lol


Mentioned in this post:


Friday, March 20, 2009

Shiny Happy Trim

I bought repro window trim for the front and rear glass. The trim was installed last year and frankly it fit fine.


But all the trim will have to come off to reseal the front and rear glass because they are leaking. So I started thinking that I would send out the original trim to have it straightened and polished...


The original trim is thicker, stronger, doesn't have sharp edges, and it clearly fits better, particularly around the corners and the curves of the window openings.


The original trim is also original Ford stuff, and it's nice to keep the car original if possible for things like this.


I put the original trim in a PVC pipe and shipped it out to Colorado to get straightened and polished, which might take two months. Not sure about the cost, but it was already nearly $50 for the pipe and the shipping! I believe it is at least $15 per foot...


The photos here show the repro corners that I don't really like that much upon close inspection. And the final photo shows the original trim cleaned up and ready to ship in the pipe.

Saturday, December 15, 2007

Adding Some Bling

There was a box of miscellaneous items that were removed from the car and they'd look better in a shiny finish. The parts were a mix of reproduction with a black finish such as the hood hinges, and original Ford with 40+ years of crud on them (see first photo of door latch as an example). They were bead blasted and then zinc plated with clear chromate at Surtronics in Raleigh. (Need to bead blast them before dropping them off at Surtronics.)


The finished parts came out great overall. But I'm going to ask them to refinish the gas tank filler neck. It was the only part that wasn't up to par. [Update: I brought the part back and they stripped it down for me and showed me the beadblasting wasn't smooth enough -- so I took the part home and wet sanded it and brought it back for a free refinish...] I think a silver cadmium would have been as good of a finished product, even smoother and longer-lasting (but more expensive). My box of parts getting refinished cost $110.

One batch would have been $55, for instance a big box of nuts and bolts, but I had some large/long pieces. I liked that the rubber and plastic pieces are not affected by the zinc plating, so complex parts don't need to be completely disassembled first...
http://www.surtronics.com/