Showing posts with label 2001 Mustang. Show all posts

Thursday, August 1, 2013

Bullitt v2.0 Gets New Heads, Stage II Cams, More

Although the Bullitt put down good power, the recently-rebuilt engine needed some sorting. The engine had been detonating at high rpms, since I first bought the car. Changing the tune didn't fix the detonation, so the engine problem was likely internal.

Fortunately, Piedmont Custom Motorsports is just down the road from me. I hadn't had a chance to work with PCM previously, but I'm fortunate that they know Mustangs of all years and were eager to help me.

PCM found that the power level was actually low—for the surprisingly high 19psi of boost. Reinstalling a stock larger blower pulley for a more reasonable 13psi resulted in a big drop in power. And a leak down test showed poor engine sealing. At this point, the motor came out to have a closer look.
The heads showed previous detonation damage/repair around the spark plug holes.
A new threaded insert on one spark plug hole could be introducing a hot spot into the combustion chamber.
In addition, not all the valves were sealing properly.
PCM dropped the engine/crossmember/trans out from below.
PCM hooked me up with a set of stock replacement heads in great shape for only $300. The machine shop properly cut the oversize valves from the original heads and installed them. At this point, I figured the upgrade to Stage II cams was worthwhile... :)
While the Bullitt was in surgery, I figured I'd clean up the intake. I spent a few hours disassembling, cleaning, and painting...
And I ended up with this. The end-of-day lighting is harsh in this photo...
Here's the intake on top of the motor at PCM. They also installed a Centerforce clutch and adjustable quadrant for me.
Here's a video of the dyno, showing 533hp at only 13psi.


Mentioned in this post:

Friday, January 18, 2013

NitroPlate: Another Great Experience

The Bullitt has been a great car, and I've really enjoyed driving it. Probably the only area that needed a little aesthetic attention was the headers and h-pipe. When one of the headers and the h-pipe each developed a crack that needed welding off the car, I had a chance to enlist NitroPlate to refinish the headers. I tried to clean up and refinish the h-pipe myself.

Before: Yikes! Too ugly for the Bullitt. But they are JBA mid-lengths—so they are very good quality overall with a thick flange.
After: I'm digging the bling factor—not to mention the increased heat retention. The service to bead blast, bake-to-clean, and ceramic coat was $200. Shipping is tough at $80 round trip (and only NC to TN!), but NitroPlate can't help that.
The JBA h-pipe and SLP converters couldn't be NitroPlated (the extreme heat in the process would ruin the converters), so I cleaned the pipes by hand, and painted them with black exhaust paint. Not sure it will hold up, but they looked pretty good at that moment. :)


Mentioned in this post:

Saturday, October 20, 2012

Cleaner Air with an RX Catch Can

First up, apologies for the lack of posts. I have a handful of new posts ready to go though, so more info coming soon. Today I'm posting about a product that I picked up for the supercharged Bullitt. However, this product should work just as well on a normally aspirated engine as well.

The RX Catch Can by Rev Xtreme is a unique catch can design that uses engine vacuum to operate a check valve to control the flow of air into the can before sending it into the intake. The dual-valve design is for supercharged cars, and uses a second identical check valve controlled by vacuum from the supercharger intake. This is a very clever unit that reduces the oil contamination in the intake charge, which is important for all cars especially with forced induction. And the unit appears well made too.

It took me a while to figure out how to install this unit on my car, but the manufacturer is very helpful and responsive to inquiries, so I was up and running soon enough. I'm posting an overview of the installation on my Vortech-supercharged 2001 Mustang GT Bullitt, since it seems that most installations happen on GM vehicles — so installation guidance for Fords is difficult to find online. (But the unit works great on any engine.)

One item I had noticed on my particular car before installing the catch can was a rattle at higher rpms. A local shop used a laptop during tuning to verify that the rattle was not detonation. I later discovered that the rattle was actually the stock PCV valve fluttering under boost. This was remedied with this catch can since I removed the stock PCV valve for this install (replacing it with two valves on the can).

I decided to modify my catch can to make it serviceable with replacement check valves and rubber grommets. This is optional of course, but for the extra $15 in valves and grommets at the local parts store, it seemed like a good idea. This modification, which now allows the valves to swivel, also helped since the original check valves can't be twisted to ease in installation of the can into the engine bay.
I don't have any photos of what was in the kit I received so I'm borrowing this photo above from the manufacturer's website. In addition to the catch can with dual valves, a drain hose (for emptying the can), and a mounting bracket (with hardware), I also bought a breather for the oil fill cap. I chose a black can with a blue breather element.
I bought a pair of replacement check valves and a pair of rubber grommets. (Assembled new valve and grommet on lower left; old removed valve on lower right.) The part numbers are on the PCV boxes, but the grommets are Help brand part number 42058. (Both are available at AutoZone, but AdvanceAuto and CarQuest sell the grommets.) The old valves can be removed from the can by twisting them out, which is made easier by pulling off the plastic elbow on the middle port temporarily.
The top of the can with the stock valves removed... The hole on the right is now larger, since I hogged it out with a stepped drill bit. There's not much more room to go as you can see. After this photo was shot, I did the left hole too.
I had bought these drill bits at Harbor Freight recently for about $10 or so. Use the fat one on the left, which cuts the larger hole without drilling too far into the can (and piercing the baffle). Also, keep the can on its side or even upside down to avoid aluminum shavings getting into the can. Clean the can thoroughly when you are done drilling
Here are the new valves and grommets installed. I hadn't popped the plastic elbow back onto the middle port yet. (When I did I used a little RTV around the inside edge of the elbow to help seal it on the port.)
Here's the can installed onto the bracket that comes in the kit. (I painted the bracket satin black.) The can is installed on the plastic radiator tank in front of the engine and looks almost factory.
Here's the optional breather on the left. Rev Xtreme modified my stock oil fill cap with a check valve and this breather element. A stock cap is on the right for comparison.

Here's the whole install... In this photo, I had left off the rubber pieces of the intake tract so you can see where the oil vapor hoses are routed. The supercharger intake pipe on my car actually had an unused port on it at the A2 location, so I removed the cap and installed the catch can hose there. The vacuum signal should be strong enough there hopefully. Also, this particular install requires more vacuum hose than what comes in the kit normally. When you buy additional hose, find hose that can handle oil.


Here's the passenger side of the engine. Notice the brass "T" which I bought at Amazon is used in place of the stock PCV valve.
The driver's valve cover uses the stock plastic elbow, but I inserted a brass fitting and attached the new hose, clamping it with nylon ties for a clean appearance.

 I had wanted a catch can or oil separator for the Bullitt for a while now, and am happy with this one. The others on the market, while very simple to install, just didn't seem as capable as this one—and I really like the dual-valve design here, too.


Mentioned in this post:


Sunday, October 30, 2011

Project EHR: Concluded! (For now...)

I've upgraded a number of pieces in the 2001 Bullitt interior so far including a new steering wheel, shifter and e-brake boots, e-brake handle, shifter trim and other billet bits, floor mats, pillar pods, rear shelf, console cover, and an epic Dynamat install.

And while I still have not installed the Alcantara headliner I bought, or wired the lighted visors and aftermarket rear view mirror, I'm calling this project done—for now.

Here's where I started a couple months ago.
The "new" interior has some worthwhile upgrades that make it a quieter and more comfortable place to be.
I'll update individual posts as the remaining final pieces are finished, particularly the headliner and rear view mirror.


Mentioned in this post:

Project EHR: Billet Bits

The model year 2001 Bullitt package offered a few billet-look items including the shifter bezel and door lock pins, as well as a real aluminum shift knob and pedal covers. I wanted to remove the billet-look items and replace them with real billet, which looks better.

I found a billet shifter bezel, and even an e-brake handle on eBay, and used the Best Offer option to knock some money off each one. (On a side note, I recommend using that eBay option whenever offered, since the reply is now automatic and immediate for the bigger sellers, and the savings can be worthwhile.)


Here's the eBay-sourced brake handle and shifter surround with the Bullitt knob.
I also found a set of billet door lock pins, but they don't seem to fit like the factory plastic billet-look ones, so I've been speaking with the manufacturer to possibly make me a pair that are threaded correctly so they'll fit better (i.e., fit flush when locked).

Project EHR: Room with a (Rear) View

Two items that immediately date the 2001 interior is the stock rear view mirror and the lack of HomeLink controls anywhere.

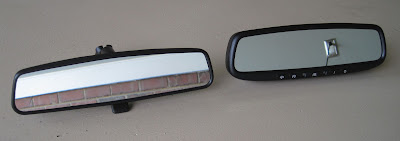
Fortunately, Gentex manufactures a line of aftermarket rear view mirrors in addition to their OE mirrors. I bought the GENK41A, which is auto-dimming and also offers 3 HomeLink buttons to control devices in your garage or home (usually garage door openers).

I installed the mirror on the windshield, but haven't wired anything yet since I intend to do the headliner recovery at the same time. When I get the time to install the mirror, I'll update this post.

Stock mirror on left; GENK41A on right.
GENK41A on left; Stock mirror on right.


Mentioned in this post:

Sunday, October 16, 2011

Project EHR: Proper Pillar Pods

One of the items I wanted to swap out in the Bullitt interior was the aftermarket AutoMeter pillar gauge pods. I could have painted the black plastic of the pods to make them the correct interior color, but it's an overlay design that fits over the stock plastic pillar underneath, and frankly I just didn't like it.

Fortunately, Speed of Sound offers their gauge pillars for Mustangs. These pillars start out as stock Ford pillars so the color and grain pattern are correct, and then a pair of cool custom pods with the proper color and grain are attached. I think this design simply looks and fits much better.

To install this new pillar with existing aftermarket gauges,
I had to elongate the gauges' wiring, since those gauges
are now positioned slightly different.


Mentioned in this post:


Saturday, October 8, 2011

Project EHR: Rear Shelf Recovery

I found some time today to finish up the rear shelf fix-up on the Bullitt. After I removed the stock rear shelf, I covered the area in Dynamat. Then I covered the shelf insert itself in some of the extra Alcantara I had bought by the roll from Dallas Custom Steering Wheel to match the Alcantara elsewhere in the now-modified interior.
Here's the rear speaker system of the stock Mach 460 stereo.
I covered this area in Dynamat, while leaving the speakers and middle ports uncovered.
The key is to leave the speakers as unobstructed as possible,
so nothing interferes with the stereo sound. But you have to add something—or you'll see the Dynamat under the grills.
I used the black felt (right) under the speaker grills. Alcantara (top) and just about any fabric will muffle the highs and midtones. The stock grey material (left) allows sunlight through (and lets sound through too.) Speaker grill cloth would be ideal.
Here's the underside, with the felt installed. I stretched the felt a bit with my hands to open up the fabric a little more.
Before installation in the car: the felt allows sunlight, and sound, to pass through.
Here's the rear shelf covered with Alcantara, with the speaker grills and baby seat anchors reinstalled. I simply covered the existing carpet with the Alcantara using 3M spray glue. (Stock carpet seen in foreground.)
I don't know what the durability of this Alcantara will be, but the look is great.
With the additional covering, and a new layer of Dynamat, I actually had to readjust the Mach 460 Bass/Treble/Fader a bit to get the sound I wanted.


Mentioned in this post:


Saturday, September 17, 2011

Facelift for the Bullitt!

The front of the Bullitt had hundreds of chips and scratches after years of racing, so I figured I'd get it fixed up. Recently, I was able to purchase new headlamp housings for about $95 each from a local dealer, and CJ Pony had a sale so I picked up a replacement piece for the bent Mach 1 lower spoiler too. These pieces come off when the bumper cover is painted, so I installed new ones during reassembly.

Before, the front bumper had hundreds of paint chips.
I removed the bumper cover and dropped it off at a body shop in Wake Forest. Two days later, I had the cover back with great body work and a great paint job for only $350. I thought that was a great deal.

I also took the opportunity to clean the now-exposed mass air flow meter housing that was hiding behind the bumper cover. The inside of the housing and the wire filaments were covered in red oil from a new K&N air filter. I also cleaned the filter itself with the K&N cleaner kit and lightly oiled it again. The car actually runs much better now.

Doesn't take long to strip the front body work from the car.
The painted bumper cover as returned from Capital City Auto Body.
In the end, everything went back together quickly, and I think the results look great for a reasonable cost.

Done! The front of the car looks new again.


Mentioned in this post:


Monday, September 12, 2011

Project EHR: Leather Interior Bits for the Bullitt

The Bullitt interior updating is in full swing. Recently, I've received a box of goodies from Dallas Custom Steering Wheel.

Here's a stock Mustang steering wheel that has been pretty heavily modified.

It has Dark Charcoal leather with matching Alcantara and silver stitching.

I asked for the wheel to be extra thick
with wide Porsche grips molded to the rim.
I carried the Alcantara over to the shifter and handbrake boots with silver stitching. And we added Dark Charcoal leather and extra padding to the armrest too.

Unlike other companies, DCSW installs the boots onto your boot frame.
So you just pop them back into your car rather than gluing and stapling them yourself.
I went a bit wild here and bought some lighted sun visors on eBay for about $25. (Mine had mirrors but that was it.) Then I sent them to DCSW too for leather. I also bought a roll of Alcantara to cover my headliner and package shelf in the Bullitt too.

I think the wiring harness should plug in behind the headliner.

Stock Ford mirrors are kinda chintzy from this era.
But these are now kinda chintzy—but with cool leather! :-)
I'll update the blog when everything is installed in the next week or two.

Friday, August 26, 2011

Project EHR: Floor Mat Menagerie

One challenge outfitting the 2001 Bullitt interior is the unusual Dark Charcoal color (code 9W): it really looks like dark smoke, but is clearly not black, or even grey. Some pieces of the dash and pillar coverings and headliner appear to be another color entirely. I decided to get some floor mats since the Mustang only comes with two for the front, and well with my five- and seven-year-old kids riding in the back seats, four mats would be better.

There are two brands of floor mat I zeroed in on: ACC and Lloyds. ACC makes carpet kits for many cars, including Mustangs, while Lloyd Mats pretty much owns the high-end floor mat business. One thing to get out of the way now: you won't find an exact match to the Dark Charcoal carpet color (unless you have already replaced your carpet itself with the ACC replacement kit).

Four ACC mats with Bullitt logos (in front) are $100 (or $60 plain).
Photo shows 2 original front mats and 2 ACC replacements.


I decided that I didn't think the ACC color was quite right for me, the Bullitt logos were redundant since the threshold sill plate says Bullitt in black already, and I really wanted contrasting binding around the edges like the GT500.

Enter Lloyd Mats. Simply put, getting color samples was a hassle from the Lloyd Mat distributors. I called seven or eight and two agreed to send some samples, but only one ever did (and it took a month). Lloyd Mats sent some additional samples directly when I had given up on seeing anything from their distributors.

I'm posting the color samples here to hopefully save others the hassle. Of course if you have a common color carpet, e.g. Black, there's no benefit in seeing the samples beforehand. :)

Actual Lloyd Mat samples against clean Dark Charcoal Ford carpet.
The flash went off here, so use as reference for color saturation, not hue...
I went with Ebony "Ultimats" with Silver Neon binding. Ordering for a 1999
instead of a 2000-2004 opens up some additional Mustang logo options.
The mats fit great and add some visual interest to the interior.
The rear mats even have an angled edge that fits around the roll bar. :)
I ended up buying these from the CarID website since they had come through with the carpet samples, although I had never bought from them before. The mats were $140 after a $10 coupon online and arrived in just two weeks. (The Neon Binding, rather than a carpet color binding, was an additional $9 option, while the Mustang logos were $29, all included in that price. Silver thread was no extra charge.) The preliminary research was a hassle, but I definitely like the look of the mats.


Mentioned in this post: