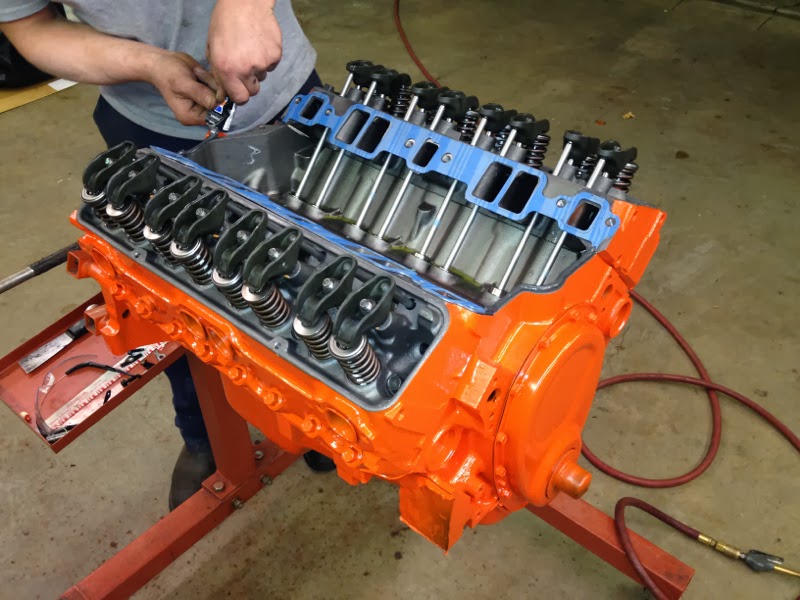
Over the past couple months I've been focusing on Project StinkBug, trying to move forward on three fronts: powertrain, underside, and prep/paint of recently acquired body pieces (hood, trunklid, etc.)
This update will explain the engine portion of the powertrain upgrade.
The original 283 looked like the heads were rebuilt before putting the car away 20 years ago. But I could see the short block was old and tired with mirrored cylinder walls and .060 over pistons already, limiting my rebuild options.
I found a buddy to help me out at this point in the StinkBug project. Josh has the knowledge and facilities that complement my own. He removed the engine in his home shop and found the block in need of cylinder sleeves. But the cost would be prohibitive...
Hmmm... A brand new GM motor for $1500 shipped. And with a three-year warranty. I figured it would perform better than a rebuilt 283, for almost half the price. (I won't achieve the 260hp/350tq rating with this combo running vintage parts.)
A week later, the new 350 shows up at Josh's home shop. In keeping with the "classic" theme of the car, I wanted this motor to look like a 283 from '57, even if I had to give up some performance.
A red 3M pad to scuff the black engine, and a can of orange engine paint, gets things rolling in the right direction quickly.
The '57 Power Pack intake with oil fill tube installed. New short water pump (painted orange) installed as well.
These '57 valve covers are way too neat to leave behind. I painted them orange and added a silver Chevrolet script over the raised letters with a stencil kit.
At this point, the rest of the new or refurbished items were added: the original rams horns exhaust manifolds, original generator with new brushes, new Blaster 2 coil painted black (with tilted coil stand for larger 4-barrel air cleaner), original distributor (with Pertronix conversion), original fan, water pump pulley, and fresh NOS Delco ignition components. That's the '57 Carter carb from Craigslist on top. We also added a slim 6" $60 PowerForce balancer and $30 steel crankshaft pulley, to replace the riveted stock pieces. These fit like stock while keeping the new fan belt in alignment.
I'm really happy with the progress so far. There are some bosses and casting stamps and a late-model timing tab on the new motor that look out of place for the 1950s of course, not to mention the side motor mount attachment points (which I won't be using). But overall I think this new engine will stay true to the look I was going for and with a sensible price tag. I really like reusing vintage parts where it makes sense too.
Every once in a while an upgrade comes along that's a "must-have" in my book — a great blend of increased performance and nicer appearance — and for a reasonable price. I recently installed a Millerspeed Belt Drive System on the front of the 331, and the "wow" factor is simply off the charts. Millerspeed offers 2 belt widths — 1" and the wild 2". I went with the narrower 1" kit for the street.
The 1" wide kit for small-block Ford. (Millerspeed photo)
...and the 2" kit with alternator fan/bracket
and power steering pump. (Millerspeed photo)
Previously, I had installed a March 1550 aluminum pulley kit on this engine, and it was an upgrade for me at the time, replacing the heavier stock-style steel pulleys. I bought the March 1-groove pulley kit (#1550), and then bought a shorter belt, so soon I had about $225 in that kit. Immediately, I noticed a crank pulley wobble, but couldn't confirm it until much later when I happened to buy a new balancer, and the pulley still wobbled. A digital caliper then showed the holes were drilled very slightly off-center. In addition, my new 3G alternator upgrade required a minimum of a 2-groove alternator pulley to turn the alternator under load, so I definitely needed a new pulley kit.
Here's the March 1550 kit I'm replacing. Belt is not included.
Enter Millerspeed... This kit has been offered for at least the past few years, and has had some positive press, but I hadn't heard of it until I stumbled upon a Millerspeed auction on eBay last month. Here's the 1" kit I bought — the wild 2" kit usually runs about $325.
Here's Millerspeed's small-block Ford kit. Belt is included.
The belt drive system installs as easily as any other pulley kit, and the quality is absolutely top-notch. The 2" kit gives off noticeable belt whine, similar to a supercharger setup, but the 1" kit is quiet.
The Millerspeed kit installed.
...and another angle.
Here's a video of a small-block Ford in a Cobra to give you an idea of the appearance and sound using the wider (and wilder!) 2" kit. I think either kit is just superb.
With the upgraded alternator I added some time ago, and the recent mini starter, not to mention the electric fan, I needed to clean up the wires. I'm using an Orbital battery, which is similar to the Optima but it's black to blend into a classic car engine bay a bit better. This battery has top posts and side posts.
I added Taylor battery terminal covers #20670 to clean up the top of the battery.
I also added some Monster Cable side terminal bolts. This allowed me to use them to install the starter, alternator, and electric fan wiring to the positive post. And an extra ground cable to the negative post. I had to cut the extra-long bolt a bit. If the item you are installing does not have a big draw this should be Ok. You wouldn't, however, use these side posts to install a winch for example.
After returning the defective Romac balancer, I was in need of a replacement. I had heard some good reports concerning Professional Products balancers (or dampers) in the forums and had seen their products on some magazine engine builds. This new PowerForce 80006 unit is not SFI-rated for racing, unlike the Romac, but my usage probably won't require this rating. In fact, balancers that can spin that fast are probably calibrated for engine speeds north of 6500rpm anyway, making them less than ideal for street use. It weighs about 9.5# vs. 6.5# for the old 289 style and 10.5# for the Romac 0209.
This unit fits a '68 302 without a spacer, but they are available if needed. One downside is that the paint on the unit comes off pretty easily, particularly with carb cleaner, is not clear-coated, and the timing marks are not etched, just painted. See where I'm going with this? :-) So I bought an MSD timing tape for about $5 to replace the timing marks I wiped off...
The price is great though. The usual mail order places are selling the 80006 for about $100. I paid $76 at Amazon with free shipping a few weeks ago. Sold! (The price has fluctuated though in the meantime...)
I believe I had spun my last balancer by at least 4 degrees, so checking and replacing balancers might be a part of maintaining a custom engine.
I decided to spruce up the engine bay, since I was digging into the intake manifold anyway. So I ordered a set of Ford Racing polished aluminum valve covers (M-6582-E302P). I got them on eBay from a drop shipper for $127, and will be replacing a set of thin stamped steel covers that are prone to leaking. These new ones have a 3/8" flange to help keep leaks at bay, (screw-in) baffles, and are 3.75" tall to clear most roller rockers.
The polish job was pretty good, but required some more hand polishing around the bolt areas. I also had to thoroughly soak the insides down with a solvent to clean out the grime and aluminum shavings (!) from the manufacturing and polishing processes.
I also bought longer stainless bolts than I used previously. I bought 1" bolts at the local Lowe's, but cut them down with a Dremel to 7/8" for a perfect fit.
Lastly, I went with a Ford valve cover gasket set (M6584A50) bought on Amazon. These things have a steel core and a rubber bead all the way around the perimeter for a good seal. Apparently they can be re-used too if needed.
Lots of various items done recently: new alternator and regulator trying to chase a charging issue. Might be the underdrive pulleys, but I'm going to add some grounds on the battery and the alternator to be sure. Painted the gold alternator fan black.
Replaced the crummy black-oxide bolts in the engine bay with the left-over zinc-plated ones I used on the body panels.
Also installed a new fuel sender since the one I installed already was bad out-of-the-box. Two tips on that: put the brass float in a cup of water for 10 seconds or so before installing the sender in the tank and look for bubbles to tell if there's a pinhole in the float. Otherwise the dash gauge will read empty the day after installation... And use some thick grease to hold the rubber gasket in place if the tank is upside down as you install the sender, otherwise it's a huge hassle.
Oh, also installed some LED reverse lights from Mustang Project. And bought their blue LED dash light kit, but haven't installed yet. (Update: I can't get the reverse lights to work, so I removed them...)
Lastly, I signed up for Hagerty insurance to make sure I'm covered if something happens.
Seemed prudent to replace the ancient starter that was on the car with a fresh rebuilt one that even had a lifetime warranty. For only $37. Interestingly, the starter that came off the car was for an automatic transmission Mustang, even though this car has supposedly had a manual transmission the whole time... I guess the lesson here is to remove and identify the old part first before buying a replacement. [Update: So I've been looking online and I think the reason for the automatic starter is the T5Z (or even just a T5) transmission swap...]
I bought a set of single-groove March underdrive pulleys #1550. Actually the crank pulley is underdriven and the alternator and water pump pulleys are about the same diameter.
The new pulleys required a smaller belt (1" smaller) but look pretty nice. I bought grade 5 hardware for the water pump. The crank pulley came with allen head bolts. The crank pulley also came with a centering ring. That ring can be slightly loose according to March. (Mine can be moved with a forceful push and that made me nervous so I called them.)
The water pump pulley required running some 180-grit sandpaper through the middle hole a few times to clear the water pump impeller shaft. I think the clear coat on the pulleys made the fit a bit too tight for my Edelbrock water pump.
I upgraded the alternator from 40amp to a new 65amp unit at the same time (for only $40). Hopefully the reduction in alternator function due to the pulleys won't cause problems. Perhaps the higher rpm rear axle gears will offset the alternator reduction... Having installed pulleys on my '89 5.0 back around 1992, I know they add hp you can really feel. (Edit: I'm having charging issues with the underive crank pulley. My alternator only puts out 12.6v at 2000rpms, which is too low. I'm looking for a single-groove billet crank pulley in the stock diameter... Edit again: I'm using the stock two-groove pulleys.)