Showing posts with label engine. Show all posts

Monday, March 3, 2014

Project StinkBug: Open Wide

A milestone day last week as the new crate 350 dressed in '57 accessories was mated to a rebuilt turbo 350 transmission and a higher-performance torque converter. I painted the transmission cast gray, which if I read the detailing materials correctly, was one of a couple correct colors for the transmission (usually a two-speed Powerglide) that year.

The transmission has a polished and finned pan on it, which probably isn't correct, but it looks good and seems high quality and leak-free. All the other bits and pieces, such as the dipstick tube, kickdown cable, etc. will be replaced for new.

Hopefully, I don't see this sight again for many, many years...
I found a stock-appearing flywheel cover (in black with no vents), and we will bolt that on shortly, along with some new linkage pieces to get the turbo 350 to work in this car.

With the radiator core support removed, the engine and transmission pretty much go right in, but the firewall area is a tight fit.
I'm hoping to have another evening or two to work on the car before shipping it back to my house from Josh's garage.

Mentioned in this post:

Tuesday, December 3, 2013

Project StinkBug: Motorvation!

Over the past couple months I've been focusing on Project StinkBug, trying to move forward on three fronts: powertrain, underside, and prep/paint of recently acquired body pieces (hood, trunklid, etc.)

This update will explain the engine portion of the powertrain upgrade.
The original 283 looked like the heads were rebuilt before putting the car away 20 years ago. But I could see the short block was old and tired with mirrored cylinder walls and .060 over pistons already, limiting my rebuild options.
I found a buddy to help me out at this point in the StinkBug project. Josh has the knowledge and facilities that complement my own. He removed the engine in his home shop and found the block in need of cylinder sleeves. But the cost would be prohibitive...
Hmmm... A brand new GM motor for $1500 shipped. And with a three-year warranty. I figured it would perform better than a rebuilt 283, for almost half the price. (I won't achieve the 260hp/350tq rating with this combo running vintage parts.)
A week later, the new 350 shows up at Josh's home shop. In keeping with the "classic" theme of the car, I wanted this motor to look like a 283 from '57, even if I had to give up some performance.
A red 3M pad to scuff the black engine, and a can of orange engine paint, gets things rolling in the right direction quickly.
The '57 Power Pack intake with oil fill tube installed. New short water pump (painted orange) installed as well.
These '57 valve covers are way too neat to leave behind. I painted them orange and added a silver Chevrolet script over the raised letters with a stencil kit.
At this point, the rest of the new or refurbished items were added: the original rams horns exhaust manifolds, original generator with new brushes, new Blaster 2 coil painted black (with tilted coil stand for larger 4-barrel air cleaner), original distributor (with Pertronix conversion), original fan, water pump pulley, and fresh NOS Delco ignition components. That's the '57 Carter carb from Craigslist on top. We also added a slim 6" $60 PowerForce balancer and $30 steel crankshaft pulley, to replace the riveted stock pieces. These fit like stock while keeping the new fan belt in alignment.
I'm really happy with the progress so far. There are some bosses and casting stamps and a late-model timing tab on the new motor that look out of place for the 1950s of course, not to mention the side motor mount attachment points (which I won't be using). But overall I think this new engine will stay true to the look I was going for and with a sensible price tag. I really like reusing vintage parts where it makes sense too.


Mentioned in this post:


Sunday, October 30, 2011

More Steady Progress on the '66

We've made a little more progress on the '66 the past couple weekends. The engine is now sitting in the engine bay, and the large-diameter Centerforce clutch is installed onto the back of the engine. The bellhousing and the transmission are installed as well.

We are ordering a few more needed bits and pieces this week to hopefully get a bunch more done next weekend.

The 331 is installed in the engine bay—headers and starter bolted on.
Here's the CenterForce DF021048 installed on the back of the engine.
I'll more closely go into the EZ EFI installation in another post as work progresses (and I have more pix to offer). The Worx has come up with what appears to be a stellar solution to one bit of the install—where to install the ECT sensor. I'm looking forward to explaining that in case anyone else decides to fuel-inject their small-block Ford.


Mentioned in this post:

Saturday, September 17, 2011

The '66 Engine is Getting The Worx!

Don't think the Bullitt is getting all the attention—steady progress is being made on the new 331 that's going into the '66 Restomod. The Worx in Fredericksburg, VA, has been working on the '66 Mustang for me, and I'm looking forward to seeing the finished product here shortly.

The new roller 302 block is outfitted with a Canton windage tray,
oil pump pickup, and a Melling HV oil pump.
The aluminum heads and intake are being reused—along with
all-new ARP hardware, Fel-Pro gaskets, and trick Cometic head gaskets.
The Millerspeed pulleys are visible, as is the new Canton oil pan.
The MSD distributor and ceramic JBAs are being reused,
but the complete FAST-EZ EFI kit is brand new.
I'm looking forward to being fuel injected!


Mentioned in this post:


Friday, April 8, 2011

The Snowball Effect... :-)

It's been a couple months since my last post. A number of things have happened, and a number more are in the pipeline, so I'm presenting an update. There's a new service shop in Northern Virginia called The Worx Garage, and having known the shop's owner for many years, I know he does great work. So, the '66 is up there getting a full mechanical upgrade. (Woo hoo!)

Here's the block in the middle of teardown.

I was pretty sure the head gaskets needed replacing, and while they definitely did, a thorough check of the engine revealed that the block really needed replacement due to cracked (and sleeved) cylinders that were too far out of round. So, we are leaving the '68 block behind and going with a late-model roller block. This allows us to use a one-piece rear main seal, and roller cam and lifters. I could have used a retrofit kit to fit a roller cam with small base circles into the old block, but the kit, cams, and lifters tend to be expensive. Fortunately, the existing forged 331 stroker crank, and rods and pistons, are being cleaned up, balanced, and reused.

Some of the parts after removal. The rest is in the trunk. :-)

We are using a new roller cam, even though the previous one made good power. The new one is more streetable and should make similar perhaps better power. Topping off the engine will be the F.A.S.T. E-Z EFI fuel injection kit, to replace the Quick Fuel Technology carb.

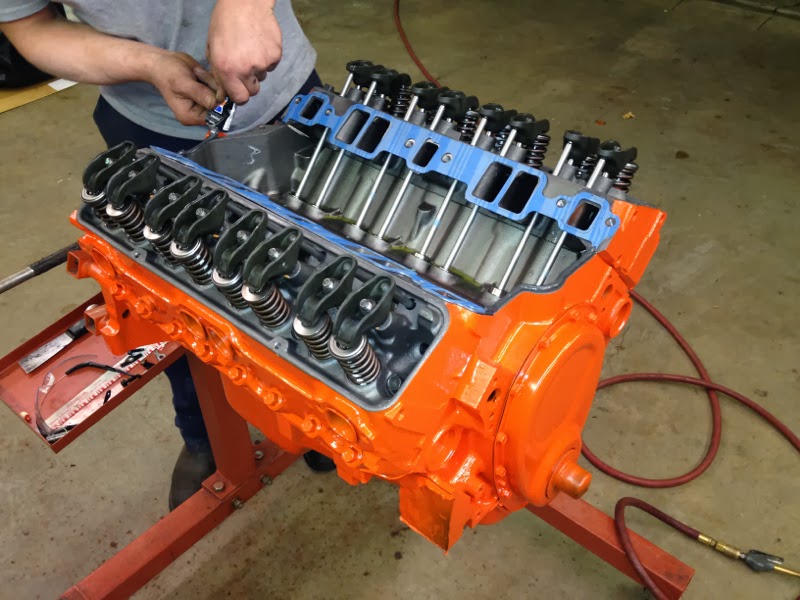
The aluminum Edelbrock heads will be reused with ARP head bolts this time.

The clutch was discovered to be the stock-style small 10" unit that will be replaced with a slighter larger, but much stronger, Centerforce Dual-Friction Kit. A new Ford Racing billet flywheel is replacing the stocker.

The T5z transmission is a leaker, but with very low miles, so it will be resealed.

I figured this upgrade is in line with the "restomod" theme (adding performance as well as reliability.) Photos are being taken of the work in progress, so I will update when I can.

Tuesday, November 30, 2010

Billet Belt Drive Bonanza!

Every once in a while an upgrade comes along that's a "must-have" in my book — a great blend of increased performance and nicer appearance — and for a reasonable price. I recently installed a Millerspeed Belt Drive System on the front of the 331, and the "wow" factor is simply off the charts. Millerspeed offers 2 belt widths — 1" and the wild 2". I went with the narrower 1" kit for the street.

The 1" wide kit for small-block Ford. (Millerspeed photo)
...and the 2" kit with alternator fan/bracket
and power steering pump. (Millerspeed photo)

Previously, I had installed a March 1550 aluminum pulley kit on this engine, and it was an upgrade for me at the time, replacing the heavier stock-style steel pulleys. I bought the March 1-groove pulley kit (#1550), and then bought a shorter belt, so soon I had about $225 in that kit. Immediately, I noticed a crank pulley wobble, but couldn't confirm it until much later when I happened to buy a new balancer, and the pulley still wobbled. A digital caliper then showed the holes were drilled very slightly off-center. In addition, my new 3G alternator upgrade required a minimum of a 2-groove alternator pulley to turn the alternator under load, so I definitely needed a new pulley kit.

Here's the March 1550 kit I'm replacing. Belt is not included.

Enter Millerspeed... This kit has been offered for at least the past few years, and has had some positive press, but I hadn't heard of it until I stumbled upon a Millerspeed auction on eBay last month. Here's the 1" kit I bought — the wild 2" kit usually runs about $325.

Here's Millerspeed's small-block Ford kit. Belt is included.

The belt drive system installs as easily as any other pulley kit, and the quality is absolutely top-notch. The 2" kit gives off noticeable belt whine, similar to a supercharger setup, but the 1" kit is quiet.

The Millerspeed kit installed.
...and another angle.

Here's a video of a small-block Ford in a Cobra to give you an idea of the appearance and sound using the wider (and wilder!) 2" kit. I think either kit is just superb.

Friday, October 22, 2010

Spring Cleanup

I had the Quick Fuel Technology carb off the engine recently and decided to add a return spring. It's a pretty impressive looking contraption, and it's a safety measure worth having.


When you install the kit you will need to buy a longer carb stud, or a bolt, which is what I did, to install the holder to the carb base...


Mentioned in this post:

Monday, October 18, 2010

May the PowerForce Be With You

After returning the defective Romac balancer, I was in need of a replacement. I had heard some good reports concerning Professional Products balancers (or dampers) in the forums and had seen their products on some magazine engine builds. This new PowerForce 80006 unit is not SFI-rated for racing, unlike the Romac, but my usage probably won't require this rating. In fact, balancers that can spin that fast are probably calibrated for engine speeds north of 6500rpm anyway, making them less than ideal for street use. It weighs about 9.5# vs. 6.5# for the old 289 style and 10.5# for the Romac 0209.

This unit fits a '68 302 without a spacer, but they are available if needed. One downside is that the paint on the unit comes off pretty easily, particularly with carb cleaner, is not clear-coated, and the timing marks are not etched, just painted. See where I'm going with this? :-) So I bought an MSD timing tape for about $5 to replace the timing marks I wiped off...


The price is great though. The usual mail order places are selling the 80006 for about $100. I paid $76 at Amazon with free shipping a few weeks ago. Sold! (The price has fluctuated though in the meantime...)


I believe I had spun my last balancer by at least 4 degrees, so checking and replacing balancers might be a part of maintaining a custom engine.


Mentioned in this post:


Monday, October 4, 2010

Balancer Blues...


When I realized that the engine block in my car was sourced from a 1968 302 rather than a 1966 289, I decided to replace the lighter 6.5-pound balancer (painted blue in the foreground above) with a heavier duty 10.5-pound unit. I bought a Romac 0209, but unfortunately I didn't have any luck with it.


The Romac arrived with some junk in the clearcoat, which surprised me, but I was willing to deal with that since it wouldn't be noticed much, except by me. But the real problem was the lack of timing marks from 0 through 30... Oops!

Intake Resurrection


While the intake manifold was off the engine I decided to give it a coat of silver engine paint. I also added some stainless bits from Performance Stainless (www.performancesst.com), including a new thermostat housing, and vacuum plug, to add to a 90-degree water fitting I already had. I also added a pair of stainless fittings to the top of the Edelbrock water pump.


Mentioned in this post:


Saturday, September 4, 2010

A Tale of Three

Before I replaced the intake manifold gaskets recently, I looked around for a good replacement gasket set. As mentioned in the previous post I went with a Mr. Gasket 5831 ultimately, but I also looked at the Edelbrock 7220 and the Fel-Pro 1250-S3 (shown in that order at left).


For my Edelbrock RPM aluminum heads and RPM Air Gap manifold, I like the Mr. Gasket 5831 best. The water passage does not have the L-shaped protrusion like on the Edelbrock 7220, which is required for other heads/applications. (Edelbrock recommends cutting it off; some recommend leaving it.) The Fel-Pro isn't really the right application for these heads/intake since the water passages in the gaskets are too large. The Mr. Gasket lets less of the gasket hang down at the bottom in the lifter valley too. All three have a Perma-Seal ring around the ports.

The Mr. Gasket is a bit tall, but fits the heads well, and I even ported the RPM Air Gap manifold a bit with my Dremel to make the fit even better.

Here's a close-up of the water passages.


Mentioned in this post:


Shades of Grey

I replaced the intake gaskets recently, due to an external coolant leak in the back of the engine. I looked at a number of different replacement gaskets before deciding on the Mr. Gasket 5831 (more on that later).


I was surprised though when the gaskets were delivered and the pair had two different color gaskets. So I ordered another pair, and they were the same color as each other, but different than the first two. What?!

I called Mr. Gasket to figure it out, and they said they get the gasket material in sheets from different international suppliers. When the gaskets are cut they almost always end up in packages with similar color gaskets, but not this time.

So I matched up two grey ones and sent the others back.

Here they are installed. Notice the coolant passages without that L-shaped protrusion on some other gaskets. Also the bottom of the 5831 does not hang down into the lifter valley where it gets soaked in oil.
 Due to minor corrosion on the aluminum heads around the coolant passages I used a very thin bit of water pump RTV and some Gasgacinch around the intake ports—on the head side of the gasket only. The orange Perma-Seal should seal the manifold side of the gasket... I used the Right Stuff on the ends, rather than Ultra Black.


Mentioned in this post:


The Timing is Right

I've been disassembling the engine on the '66 in my spare time the past few weeks, identifying some various fluid leaks. One area that I hadn't heard about examining is the timing cover, particularly the coolant passages. This makes sense since the water pump is attached to the timing cover, and then the cover is attached to the engine block. The cover holds back coolant under pressure, and oil too.

Covers shown L to R: Stock cover (with corroded coolant passages); California Pony Cars cover with cast pointer;  Edelbrock cover with bolt-on pointer.
It took awhile to figure out the best timing cover for my application.

Here are the backs of the same covers in the above order. I've bought some Edelbrock components previously and have been happy. This time however, the #4250 cover seemed unfinished, like someone gave up grinding down the cast lines when they were half done.
Here's the stock style timing cover I bought from Virginia Classic Mustangs. It's a California Pony Car cover, made in the USA, and the quality seems fantastic. This one has the bolt-on timing pointer (not the cast pointer seen in the image at top from '65-'66 Mustangs.) I went with this style since the engine is a '68 302, and will have a 302 balancer on it, not the smaller '66 balancer that was on there.
I actually spent a couple hours with some extra fine steel wool, buffing the aluminum—hopefully that finish lasts a bit!

Sunday, April 19, 2009

Mount Up!

So I've noticed that the driver's side header fit tight around the shock tower area, and under hard acceleration, the shifter handle would rock back and forth in my hand left to right. The transmission mount seemed fine. Then I noticed a one inch scrape on the underside of the hood where the air cleaner wing nut touched the hood as the engine lifted and rocked back and forth. A visual inspection of the driver's side motor mount showed the rubber layer seemed to be broken. After removal from the car, the damage was more obvious.


Most people purchase the fully adjustable mounts on the market for these cars. I don't need full adjustability even though the car has a T5Z transmission installed. So I bought the Total Control Products mounts for a few bucks less. These are not as adjustable, but are also serviceable should the bushing wear out one day. I was impressed by their heft and quality of manufacturing. They even use 3 bolts to mount to the frame, using a previously unused but present factory hole for the third bolt.

They added very little extra noise, vibration, and harshness (barely more than a broken mount anyway.) The shifter handle and the engine (presumably) stay steady under hard acceleration. Particularly for a stroker motor, I'd have to say these heavy-duty motor mounts are mandatory items.

Monday, April 6, 2009

Undercover...


So I was replacing the valve cover gaskets the other evening and figured I'd take a pic of the rocker arms. (The color matches the car!) I went with a pair of rubber gaskets with a steel core from Jeg's. The old gaskets were cork and the driver's side was leaking in the back. I used some grey sealant on the top of the new gaskets to bond them to the valve covers better. Not sure this was the right thing to do, but it's been about 20 miles and no leaks... Looking at the pic, I need to change the oil.


Mentioned in this post: